FTP Session
In HOD Hex Client, users can create an FTP Session to connect the Host machine and transfer files from Local to Host and vice versa. By default, FTP sessions will be disabled in the HOD Hex Client. To view FTP sessions in the HOD Hex Client, the “EnableFTPsession=true” parameter should be added to the web.properties file.
Flow of events:
- Users can create an FTP session using the Deployment Wizard.
- Once the page is created successfully in the Deployment Wizard, access the page in the browser.
- Once the page is accessed, click the FTP icon and start the session.
-
Once the session is established, log in to the FTP using your username and password.
Note:- FTP Supports FTP, FTPS, SFTP(SSH-FTP) protocols.
- FTPS use tls_keystore_path, tls_passphrase, wellknown_keystore_path, wellknown_keystore_passphrase properties in prodConfig.properties file for login.
- FTP-SSH supports Password and Public Key Authentication.
- Password Authentication: For Password authentication, a user can give a username and password to log in.
- Public key Authentication: The user must enter the following values
to perform FTP-SSH Public Key Authentication.
- KeyStore Password
- Public Key Alias
- Keystore File
Note:Enable the SSH public key authentication for the page to see the keystore password and public key alias fields. - The user can either perform an upload or download at a time. If the transfer is in progress and the user tries another transfer operation, a “Transfer in progress” message will appear.
Toolbar Icons:
In the FTP toolbar, users have Duplicate, Properties, ASCII, Binary, and Close icons.
Upload Section:
Users can upload files using this option.
Steps to upload the files:
- Click the Browse button.
- Browse and select the required files.
- File names will be displayed in the browse span.
-
Click the Upload button.
Note:- Users can see file transfer information in the transfer progress table.
- Users can also see the number of files added in files added.
- Click the Cancel button to remove all files from the browse span.
Remote Directory Section
Objects:
- Users will have Refresh, Home, Delete, and Download buttons in the Objects tab and a Host table to list files.
- In Addition, create folder and file icons were present for creating folder and file.
- Users have options for sorting the files and changing the view of the table to Sort by and View by.
- Users can see the host table in a more readable format by clicking the Maximize icon.
- Use right-click to rename/delete a single file.
Sharing:
This tab displays limitations for the file transfer for both uploads and downloads. The user can choose the maximum file size up to 2GB (combined size of selected files), and three files can be transferred (upload/download) at a time. Zip and Parallel file transfer modes are available in the download section, and the default mode is Zip. Use the Reset button to reset values to default.
Transfer Progress Table:
This table gives the following information about the transfer:
- TaskID
- Source
- Destination
- Status
- Percent
By default, the table is minimized. Use the maximize icon to display the table. The Zip file download progress is Indeterminant.
FTP Backend:
FTP Backend service must be started externally on the server side. Users can use start and stop scripts provided for the FTP Backend service by changing the appropriate path in those files.
FTP Backend Properties:
To configure the FTP backend, the user must specify configuration details in the prodConfig.properties.
#ftp backend port
port=3090
#ftp frontend url (CORS)
url=http://localhost:8080
#https
secure=false
#/lib/
keystore_path=default
keyAlias=serverlabel
passphrase=hodpwd
#tlsdetails
tls_keystore_path=default
tls_passphrase=hodpwd
#welknowncertificatedetails
welknown_keystore_path=default
welknown_keystore_passphrase=hodpwd
#No Of FTP_Users
no_of_users=3- port: Port on which the FTP backend (Node js) is running.
-
URL: The user can add multiple app server URLs separated by a comma (,) used for the CORS mechanism. Only specified URLs are authenticated to access the FTP backend.
Syntax: http://AppserverMachineIp:AppserverPort
Example: http://127.0.0.1:8080
- secure: Boolean variable enables the https in the backend server.
- keystore_path: By default, the value for this property is “default”, which means it will take /bin/HODServerKeyStore.jks file for https. If the user wants to use a different JKS, the user must give the complete path of the JKS.
- keyAlias: Alias to the key that needs to be used for https.
- passphrase: Passphrase for the keystore.
Below are applicable only for FTP Backend:
- tls_keystore_path: By default, the value for this property is “default”, which means it will take /HOD/CustomizedCAs.jks file for FTP-TLS login. If the user wants to use a different JKS, the user must give the complete path of the JKS.
- tls_passphrase: the password for the TLS keystore.
- wellknown_keystore_path: By default, the value for this property is “default”, which means it will take the /HOD/WellKnownTrustedCAs.jksfile for FTP-TLS login. If the user wants to use a different JKS, the user must give the complete path of the JKS.
- wellknown_keystore_passphrase: the password for the Wellknown keystore.
- no_of_users: Number of concurrent users login that the backend can support. (If the user tries to log in but concurrent login capacity is already occupied, then the ‘Number of users exceeds’ error will appear).
-
Make sure that the user adds FTP backend URLs in ftpBackend params in web.xml of HOD Hex Client, respectively.
Syntax: http://FtpBackendIP:FtpBackendPort
Example: http://127.0.0.1:3090<context-param> <param-name>ftpBackend</param-name> <param-value>http://localhost:3090</param-value> </context-param>
- Issuer certificate should be added in JKS, which is used for FTP-TLS.
- CN (Common Name) of the certificate must match the Destination address for FTP-TLS login.
- Supported algorithms for SFTP are listed FTP/VT SSH Support List.
- JKS holding your private key for public key authentication of SSH protocol will be transferred from the client machine to the server machine.
- Minimum requirements for FTP Backend Service are.
- 10 users
- 8 GB RAM
- 500 GB memory
FTP Caching of the Delta Changes:
The cache data is stored/captured on the “Sharing Tab” of the FTP main screen at the browser level (not the session level).
Note: Delta changes will remain until the cache is cleared.
FTP Performance Improvements:
- Upload Stream Changes:
FTP uploads will be streaming rather than buffer uploads, i.e., the uploaded file will be transferred directly to the host rather than saved on the backend server and then to the host. Request Timeout property is added in the config file which can be modified by the user (default value is 20 minutes) but will stop 1 minute before the timeout (RequestTimeout-1) to close the connections properly.
- SSH Ciphers/Algorithm:
The default settings of the SSH do not support SHA-1 algorithms. Thus, we are overriding the default algorithm. For more details on the algorithms and ciphers supported by the Nodejs SSH library, refer FTP/VT SSH Support List.
Starting of FTP as a Java Admin Console service:
To start FTP services in Admin Console, enable AUTO-START for FTP service in HOD_Distribution/private/NSMprop. C:\Program Files\HCL\ZIEForWeb\private
Download the required files from Fix Central, place the files in the appropriate folder (as shown in Figure 1), and then restart the HOD service.
- Make sure FTP service ports are available. Once the HOD service is started, users can see the FTP service status in Adminconsole ➔ Services.
-
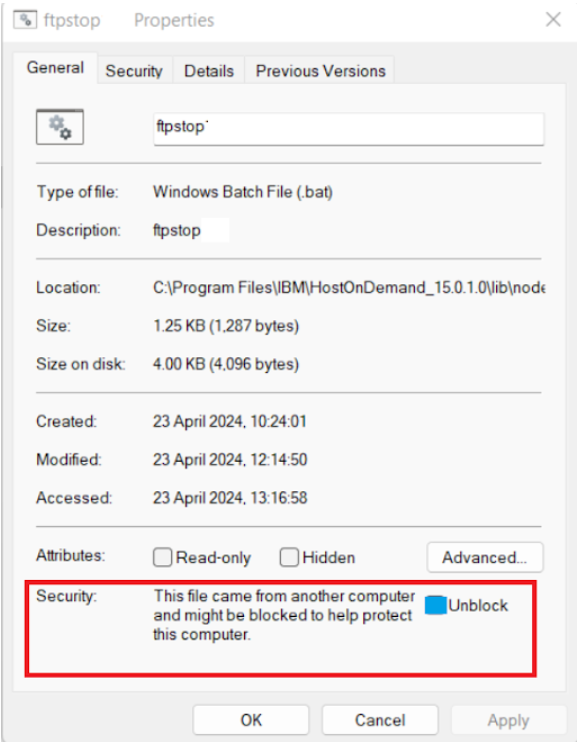
After pasting the files, ensure that the ftpstop.bat file properties are enabled using the settings below.
Enabling FTP Backend Server Configuration from Admin Console:
FTP Backend will be running on the HOD server. For the initial release, make the required changes to the server configuration properties and save the configuration under <distribution Directory>/lib/node/ftp_build/config based on the environment.
 Figure 1
To configure FTP Backend Server Properties:
- Login to the Admin Console.
- Click the Services tab in the Admin Console.
- Click the FTP Backend Server Configure button, and a popup appears with all the FTP server configuration properties.
- Update the required configuration properties and Click Save.
- Restart the server to reflect the modified configuration.
- requstTimeout: Timeout for the request sent.