Deployment Strategies Across Different Platforms
IBM HOD Hex Client package is available on IBM fix central.
Deployment Steps for Tomcat and Liberty Server:
Unlike previous versions of HOD Hex Client which supported only IBM WebSphere Application server (WAS) as the runtime environment, from HOD Hex Client version 1.10 onwards, the following application servers are also supported as runtime environments:
- IBM WebSphere Liberty, which is a highly composable, fast to start, dynamic application server at runtime environment.
- Tomcat, which is used as application server for web-based application.
These servers were based on Java 2 platform and Enterprise Edition (J2EE) which adopted a multitier distributed model, and also support multiple applications running simultaneously.
| HOD Hex Client Installer | Supported Application Server |
| HEXCLIENT_EAR/HEXCLIENT_WAR | WAS Liberty Server -WebProfile 8(below Webprofile 8) and Tomcat Below 10 versions |
| HEXCLIENT_EAR_JAKARTA/HEXCLIENT_JAKARTA_WAR | WAS Liberty Server -WebProfile 10(above Webprofile 8) and Tomcat above 10 versions |
Deployment steps for Web Application Server:
- Extract the contents of IBM HOD Hex Client package (.zip) file
- Deploy the EAR (Enterprise Application aRchive) file on WAS using WAS admin console.
- For the HOD Hex Client versions up to 16.0, configure the initial parameters of HOD Hex Client application on WAS with Host On-Demand service manager and web server details as illustrated in the following image.
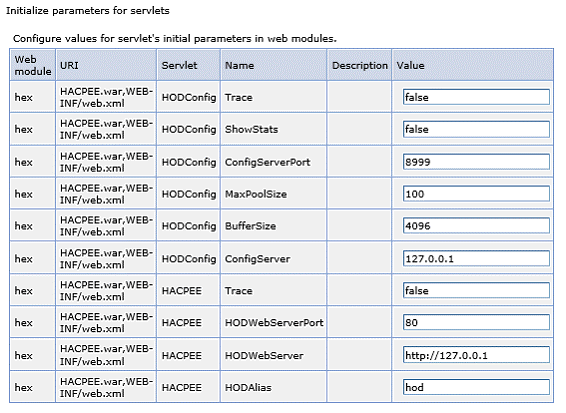
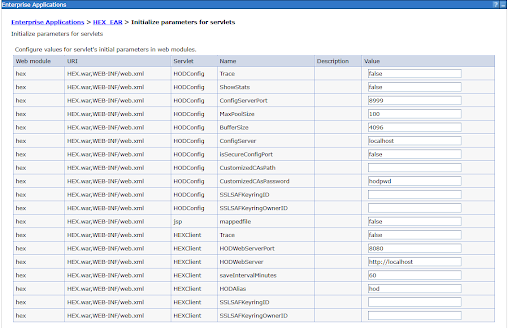
- For the HOD Hex Client from 16.0.1
onwards, configure the initial parameters of HOD Hex Client application on WAS
with Host On-Demand service manager
and web server details as illustrated in the following image.
License Manager
When the user launches an HTTPS secure connection with client authentication enabled in the browser, the unique user will be a combination of IP address instead of the system username and the common name (which reads from the certificate the client is presented with while accessing the HTTPS secure connection).
Deploying HOD Hex Client in Tomcat and IBM WebSphere Liberty server
1. Deploying HOD Hex Client in Tomcat server
Tomcat is normally defined as a reference implementation of the Java Servlet and Java Server Page (JSP) specifications. It basically executes Java servlets and renders web pages which include JSP coding.
To deploy an application using the Apache Tomcat manager web application, follow these steps:
- Download and install Tomcat server in user Machine.
- Host name and port number is defined at the time of installation.
- Start the Tomcat server and run URL (localhost:8080) in browser.
- Under Manage App category, deploy .war file under Deploy section
- Web application can be run from that deploy section.
By default, Tomcat server allows only 50MB size of file to deploying, but our HOD Hex Client war file exceeds that limit. So, we need to upgrade the file size limit on tomcat server. This can be achieved by doing some modification on web.xml.
PATH: (C:\Program Files\Apache Software
                Foundation\Tomcat9.0\webapps\manager\WEB-INF\web.xml.)
We can modify the file size to 100MB/200MB under multipart-config element in web.xml
Note: Value should be in bytes.
2. Deploying an application in IBM WebSphere Liberty server
- Download and Install 'IBM Websphere Liberty Server' in Local machine.
- Create a server by using the command
server create
                    servername
. - In the server.xml file that was created under server folder, in that xml file
http portandhost namecan be changed as per need.
Applications can be configured in two ways:
Method I
- Under installation directory of Liberty server, there is folder name called
dropins.
(usr/servers/servername/dropins) - Drop the application
.ear/.warfile into that folder. - After that Start the server using command server
start servername. - Then run the URL
hostname: port/context-rootin browser.
Method II
- Define the application by using an
applicationelement in server.xml.<application context-root= “sample” type=”war” id=”sample” location=” c:/app/sample.war” name=”sample”/> - The context-root attribute specifies the entry point of the deployed application.
NOTE: In an application server server.xml configuration, the application element can contain a context-root tag. This context-root tag is applicable in combination with the tag type="war". For all other application types, the context-root element has no effect. It is not possible to override the context-root for either an EAR application, or an EBA application. It is only possible to do an override for a stand-alone war file, or web Application.
Once the configuration is done, server can be start and run it on browser.
- Start the server in foreground by using the command
server start
                        servername
or else run the server by usingserver run servernamecommand. - Test the application at
hostname: port/context-rootin browser. - Optional: Stop the server if you do not need it by using command
server
                        stop servername
.
Support for Jetty Server:
In addition to other supported servers, an embedded server (part of Host On-Demand) is also included in HOD Hex Client, as part of the deployable application. The advantage of the embedded One Server is that it is not necessary to pre-install a web server in the deployment environment. Embedded servers are scalable and can host applications that support millions of users.
By default, the parameters defined in the code are picked up by the Service Manager when it starts, but Administrators can override the default values by defining parameters of the existing config.properties (in the HOD publish directory).
Administrator has to update /lib/HEX.war(open using 7-zip)/WEB-INF/web.xml with the below parameters:
publishDirContextPath = hod
WebAppServerPort=8080
WebAppServerSecurePort=8443
ConfigServerPort=8999
zfpClientContextPath=hex-
ConfigServerPort
-
ConfigServer
-
HODWebServerPort
-
HODWebServer
- HODAlias
Under HODConfigServlet, configure the following parameters:
ConfigServerPort – Specify the port number used by the Host On-Demand configuration server.
ConfigServer – Specify the hostname or IP address of the system where the Host On-Demand server is installed.
Similarly, under HODZFPServlet, configure the following parameters according to your web server environment:
HOD Web Server Hostname/IP Address – Specify the hostname or IP address of the web server hosting Host On-Demand.
HOD Web Alias – Specify the configured web alias for Host On-Demand.
HOD Web Server Port Number – Specify the port number used by the web server.
<servlet id="HODConfigServlet">

<init-param id="InitParam_3">
<param-name>ConfigServerPort</param-name>
<param-value>8999</param-value>
</init-param>

<init-param id="InitParam_6">
<param-name>ConfigServer</param-name>
<param-value>localhost</param-value>
</init-param>
-----------------------------------------------------------------------
<servlet id="HODZFPServlet">

<init-param id="HODWebServerPort">
<param-name>HODWebServerPort</param-name>
<param-value>8080</param-value>
</init-param>

<init-param id="HODWebServer">
<param-name>HODWebServer</param-name>
<param-value>http://localhost</param-value>
</init-param>

<init-param id="HODAlias">
<param-name>HODAlias</param-name>
<param-value>hod</param-value>
</init-param>