Using the Dojo TabContainer widget in a HATS Web project
The example that follows shows using the Dojo TabContainer widget in a HATS Web project to render the data on the Display Report host screen in two tabs, one using the HATS Dojo Enhanced grid widget and the other using the HATS Graph widget.
To use the Dojo TabContainer widget in this example, follow these
steps:
- Create a HATS Web project with the Use Dojo technology option selected.
- Start the Host Terminal, navigate to the first screen of the report
and click Create HATS Screen Customization on
the toolbar.
Figure 1. Host screen to render using the TabContainer Dojo widget 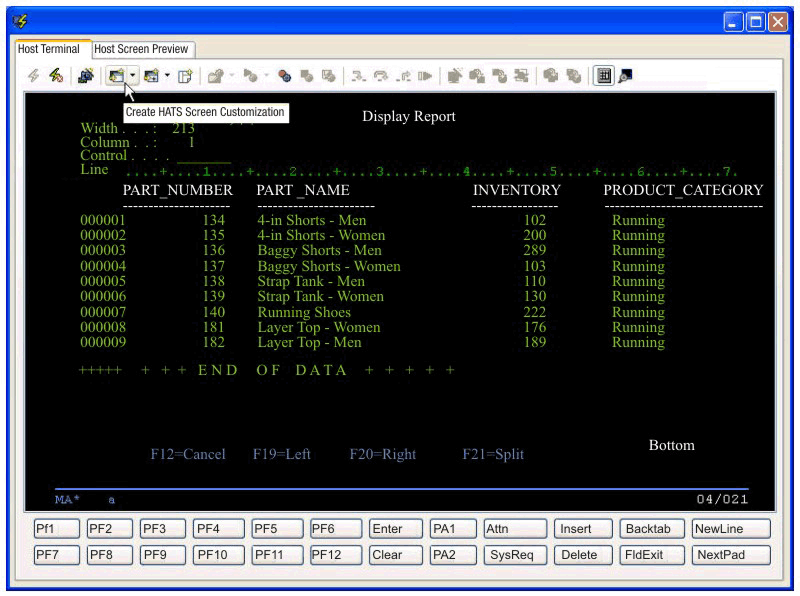
- On the Screen Customization page, accept the defaults and click Next.
- On the Screen Recognition Criteria page, specify how to identify the screen and click Next.
- On the Actions page, accept the defaults and click Finish. The transformation .jsp file opens in the Page Designer along with the Insert Host Component wizard.
- Click Cancel on the Insert Host Component wizard.
- From the Palette view, under Dojo Layout Widgets, select TabContainer and drop it to the transformation .jsp design area.
- In the Insert Tab Container dialog, specify
2for the Number of tabs and click OK. - In the Properties view for the tabs, or the Source view, change
the titles of the tabs. Change
Tab1toTableandTab2toGraph. - From the Palette view, under HATS Components, select Table (visual) and drop it to the Table pane.
- In the Insert Host Component wizard, on the Screen Region page, select the screen region to be displayed as a visual table. For this example, select the region including the four columns of data and the dashed lines above the first row of data.
- On the Rendering Options page, select Table (visual) from the Components list and click the Component Settings button.
- On the Settings - Table (visual) page, clear the Use project defaults box, set Rows to exclude to
1, select Extract column header test from row above table and click OK. - On the Rendering Options page, select Enhanced grid (Dojo) from the list of widgets and click Finish.
- Press
Ctrl-Sto save your work so far. - From the Palette view, under HATS Components, select Table (visual) and drop it to the Graph
pane.
Note:If you have difficulty switching to the Graph pane in the Design view, drop the Table (visual) component to before the
</div>tag for the Graph pane in the Source view. - In the Insert Host Component wizard, on the Screen Region page, select the same region you selected for the Table pane.
- On the Rendering Options page, select Table (visual) from the Components list and click the Component Settings button.
- On the Settings - Table (visual) page, clear the Use project defaults box, set Rows to exclude to
1, select Extract column header test from row above table and click OK. - On the Rendering Options page, select Graph (horizontal bar) from the list of widgets and click the Widget Settings button.
- On the Settings - Graph (horizontal bar) page:
- Clear the Use project defaults box.
- Set the Number of data sets to
1. - Type
Inventoryfor the X-axis title. - Type
Part Namefor the Y-axis title. - Under Extract data point labels,
set Column to
2. - Click Data sets.
- On the Data Source Settings page, set Data
set 1, column to
3, select Orange in the Color drop-down, delete the legend label, and click OK. - On the Settings - Graph (horizontal bar) page, click OK.
- On the Rendering Options page, click Finish.
- Press
Ctrl-Sto save your work. - In the Page Designer, click the Preview tab to see a preview of your transformation.
- Run the project. You can adjust the height and width of the TabContainer widget to get the desired display at runtime. Note that you must use fixed height and width on the TabContainer widget in case the tabbed folder is not displayed at runtime.
Below is the source for the table area containing the TabContainer in this example.
<!-- Insert your HATS component tags here. -->
<table width="783" height="500" cellspacing="0" cellpadding="0" border="0">
<!-- flm:table -->
<tbody>
<tr>
<td height="31" width="12"></td>
<td width="771"></td>
</tr>
<tr>
<td height="469"></td>
<!-- flm:cell -->
<td valign="top">
<div id="TabContainer" dojoType="dijit.layout.TabContainer"
tabposition="top" style="height: 469px; width: 771px">
<div dojoType="dijit.layout.ContentPane" title="Table" id="Tab1">
<HATS:Component
row="7" erow="16" col="14" ecol="77"
alternate="" alternateRenderingSet="" textReplacement=""
widget="com.ibm.hats.transform.widgets.dojo.EnhancedGridWidget"
widgetSettings=""
type="com.ibm.hats.transform.components.VisualTableComponent"
componentSettings="minRows:1|validateCharacterType:false|
includePreviousLineAsHeader:true|columnBreaks:|minColumns:1|
behaveAsInDefaultRendering:false|areaAsInDefaultRendering:false|
overrideRecognitionBehavior:false|evaluateBetterTableParameter:numberOfCells|
excludeCols:|numberOfTitleRows:0|columnDelimiter: |
betterTableHasLeastOfParameter:false|includeEmptyRows:true|
excludeRows:1|" />
</div>
<div dojoType="dijit.layout.ContentPane" title="Graph" id="Tab2">
<HATS:Component
row="7" erow="16" col="14" ecol="77"
alternate="" alternateRenderingSet="" textReplacement=""
widget="com.ibm.hats.transform.widgets.HorizontalBarGraphWidget"
widgetSettings="extractSource:col|backgroundImage:|dataSource1Color:#ff8040|
backgroundColor:#ffffff|extractLabels:true|dataSource3Legend:Series 3|
dataSource2Color:#00ff00|yAxisTitle:Part Name|textAntialiasing:true|
labelIndex:2|extractDataSetLabels:false|height:400|alternateText:Graph.jpg|
width:400|dataSource3:3|defaultFont:SansSerif-PLAIN-12|dataSource2:2|
dataSource1:3|dataSetNumber:1|dataSource2Legend:Series 2|
dataSource3Color:#ff0000|dataSource1Legend:|xAxisTitle:Inventory|
axisColor:#000000|labelColor:#000000|dataSetLabelIndex:1|"
type="com.ibm.hats.transform.components.VisualTableComponent"
componentSettings="minRows:1|validateCharacterType:false|
includePreviousLineAsHeader:true|columnBreaks:|minColumns:1|
behaveAsInDefaultRendering:false|areaAsInDefaultRendering:false|
overrideRecognitionBehavior:false|evaluateBetterTableParameter:numberOfCells|
excludeCols:|numberOfTitleRows:0|columnDelimiter: |
betterTableHasLeastOfParameter:false|includeEmptyRows:true|
excludeRows:1|" />
</div>
</td>
</tr>
</tbody>
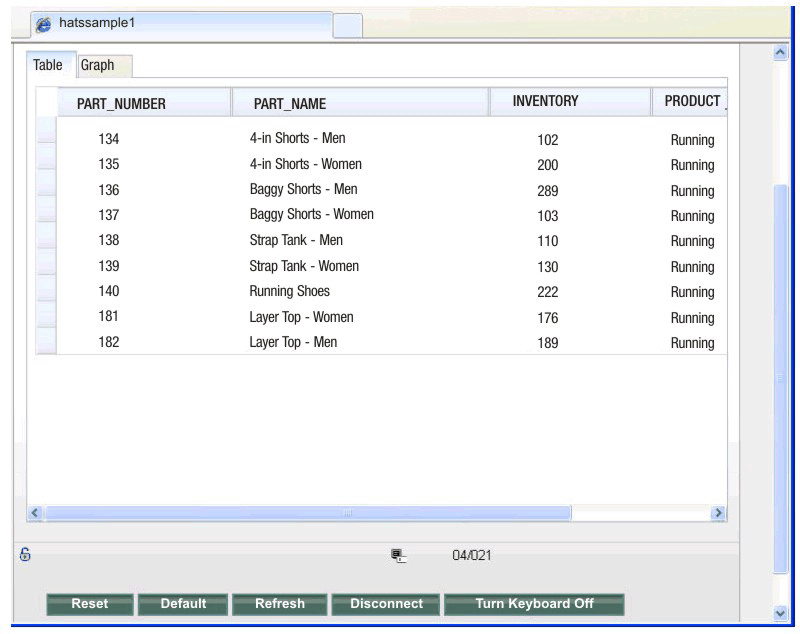
</table>The following figures show this example TabContainer widget displayed at runtime. On the Table tab notice the data rendered using the HATS Dojo Enhanced grid widget.
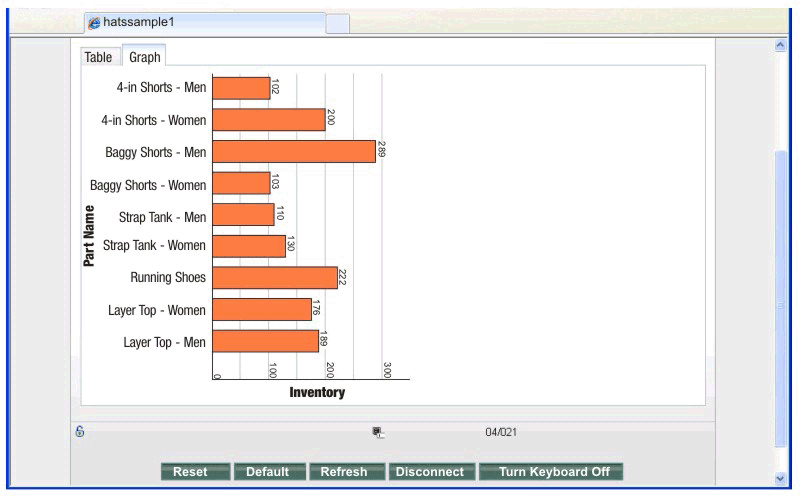
On the Graph tab notice the data rendered using the HATS Graph (horizontal bar) widget.