Configuring the TIBCO Rendezvous probe
The TIBCO Rendezvous probe runs on a TIBCO Rendezvous daemon that is configured in the Architecture School Physical View. You can configure the default probe or add another probe.
Before you begin
PATH variable
to the Rendezvous native libraries. - On all platforms, the system
PATHvariable must include the path to the Rendezvous bin folder. - On Unix-like systems, the system variable
LD_LIBRARY_PATHorLIBPATHmust include the path to the Rendezvous lib folder. For example, to set the path (by using bash):export LD_LIBRARY_PATH=$LD_LIBRARY_PATH:/usr/tibco/rv/8.4/libNote: On AIX® versions earlier than 5.3, useLIBPATHinstead ofLD_LIBRARY_PATH - Ensure that both Rational® Integration Tester and TIBCO Rendezvous are installed in either 32-bit mode or 64-bit mode because the native libraries are not compatible between the modes.
Procedure
- Edit the TIBCO Rendezvous resource and click
the Probes tab.
- Next, you can choose from one of the following
actions:
- To add a new probe, click .
- To copy an existing probe, select the probe and click Copy.
- To delete a probe, select the probe and click Remove.
- To configure an existing probe, select it and modify its settings in the configuration panel on the right.
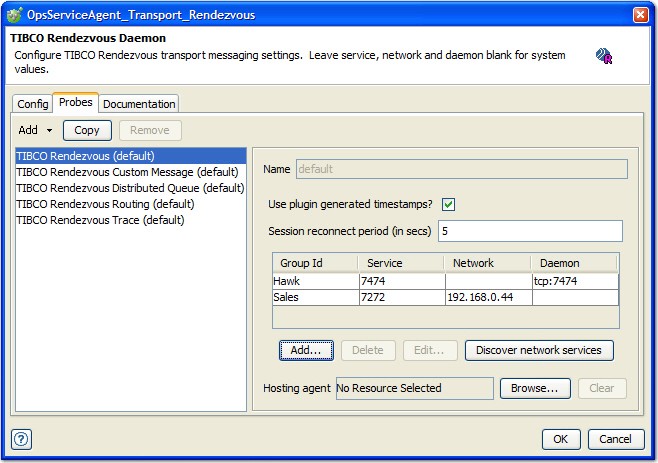
- For probes other than the default one, you can enter a name in the Name field.
- Monitoring groups are added to the probe
and their names are used to display data in charts. The service/network/daemon
is configured for each RVD transport to monitor. You can manually
enter this data or click Discover network services to
use the network services discovery utility. (For information about
this utility, refer to Running the TIBCO Rendezvous probe.)
Backup RVDs can be configured for each service that you want to monitor by adding more than one group with the same name. The probe connects to the first RVD transport listed for that group; if this RVD goes down, the probe connects automatically to the next applicable RVD. If none of the configured RVDs are available, the probe attempts to reconnect every Session reconnect period.
If the Use plug-in generated timestamps check box is selected, the probe sets the date and time to be stored. Otherwise, the data and time are taken from the RVDs data.
Note: RVDs version earlier than version 7 do not contain this data field, so the server time is used. If your servers do not have time synchronization, it is recommended that you enable this option because RVD times can be misleading. - To select or change the agent that hosts the selected probe, click Browse next to the Hosting agent field and select the agent you want from the project resource tree.
- To clear the current selection, click Clear.