Creating basic stubs
A basic stub, also called a hardcoded stub, is a stub that always returns the same response. You can create a basic stub from recorded events by using the Recorded Events wizard from the Recording Studio perspective.
About this task
Procedure
-
In the IBM®
Rational® Integration
Tester Recording
Studio perspective, select one or more recorded events in the Events View window.
Select events that represent the message exchanges that you want to simulate. You can choose multiple message exchanges because Rational® Integration Tester can distinguish among them and can create appropriate operations. Thus, a stub created in Rational® Integration Tester can simulate more than one operation.
-
Click the Save Stub from selected events icon
 on the Events View toolbar.
Alternatively, right-click the messages and click Save Stub from the menu displayed.
Important: The first and second windows of the Recorded Events wizard are the Resource Type and Data Storage windows. These windows are displayed only if you click the Save icon or press the CTRL+S keys.
 -
Click the Save Stub from selected events icon to bypass the Resource Type and Data Storage
windows.
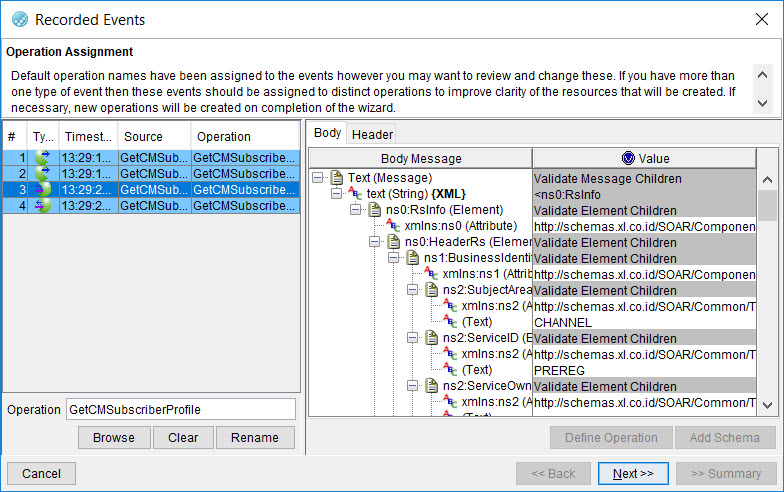
The Operation Assignment window of the Recorded Events wizard is displayed.
-
In the Operation Assignment window, modify the operation and the events to be associated with
the stub.
The following table describes how to use the Operation Assignment window.
Task Steps Define names of operations from recorded messages payloads. - Select a message that contains a field with the value that must be used as the name of the operation.
- On the Body tab, select the relevant field.
- Click Define Operation.
The location of the field within the message is used to define the operation names for all selected messages or all messages if only a single message is selected.
Select a different operation in the current Rational® Integration Tester project. - Click Browse to open the Select a Resource dialog.
- Select a different operation.
- Click OK.
Select a different operation that is not in the current project. - Click Clear. Alternatively, replace the existing text in the Operation field.
- In the Operation field, enter the name of a new operation. The operation is created after you complete the actions in the Recorded Events wizard.
- Click Rename.
- If you have not selected all the events displayed on the Operation Assignment window for assignment to the new operation, you are prompted to confirm whether you want any non-selected events on the window to be assigned to the new operation.
Apply a different schema to a recorded event. - On the left side of the window, select the event that you want to modify.
- On the right side of the window, click the Body or the Header tab (as appropriate).
- Select a field.
- Click Add Schema to display the Schema Selector window.
- Click OK in the Schema Selector window.
- Click Yes to confirm and apply the selected schema to the selected event.
Tip: If you are creating a stub for multiple operations, Rational® Integration Tester attempts to verify that all selected recorded events are associated with the correct operations. -
Click Next.
The Transaction Assignment window is displayed.

-
In the Transaction Assignment window, group events into transactions.
A transaction can consist of request-reply messages or a series of events.
The following table describes how to use the Transaction Assignment window.
Task Steps Group two or more recorded events into a single transaction. - On the left side of the window, select the events that you want to group into a transaction.
- Click Group. The Group# field of the selected events changes.
Ungroup a transaction. - On the left side of the window, select the events that you want to ungroup.
- Click Ungroup. The Group# field of the selected events changes.
Delete temporary rules that have affected the grouping in the current Recorded Events wizard session. Click Delete Temporary Keys. Disable global rules that have affected the grouping in the current Recorded Events wizard session. Clear the Enable Persisted Keys check box. Important: The Enable Persisted Keys check box is checked by default if there are rules which might have changed the way in which the events are grouped.Add one or more key fields to one or more selected events displayed on the window. - On the left side of the window, select the event that you want to modify.
- On the right side of the window, click the Body tab, the Header tab, or both (as appropriate).
- Select a field.
- Click Define Key.
If the value of the field is also displayed in any other fields for other events displayed on the window, the Define Key dialog box is displayed. Otherwise, an error message is displayed.
Restriction: The key defined is applied only to the current Recorded Events wizard session.- In the Define Key dialog, clear the check boxes of any other events that do not have the same logical value as the field you selected.
- Optionally, select the Save as a Field Type called check box and enter a
comment for the key field.Attention: Selecting this check box enables you to persist the defined key beyond the current Recorded Events wizard session. You can view any comment that you enter in the key field from the Rule Cache view of the Architecture School perspective.
- Click OK to save your changes and close the Define Key dialog.
Messages are grouped based on the following criteria:- Messages in the window that are not already grouped into transactions.
- Messages that contain the key field that you have defined.
Apply a different schema to a recorded event. - On the left side of the window, select the event that you want to modify.
- On the right side of the window, click the Body tab, the Header tab, or both (as appropriate).
- Select a field.
- Click Add Schema to display the Schema Selector window.
- Click OK in the Schema Selector window.
- Click Yes to confirm and apply the selected schema to the selected event.
-
Click Next.
The Header Transformation window is displayed.
In the Header Transformation window, all HTTP headers that were identified in the recorded traffic are displayed. Only those headers that are useful in distinguishing one operation from another are enabled. The remaining headers are disabled to make the message or messages more generic.
-
Change any of these assignments if necessary and click Next.
The Summary window is displayed.

-
In the Summary window, review the configuration of the stub and save
it.
The following table describes how to use the Summary window.
Task Steps Open the stub in the Stub Editor after you have saved it and quit the Recorded Events wizard. Select the Open resource after finish check box. Save your stub. In the Stub name field, enter a name for the stub, and then click Finish.
Results
The Test Factory perspective of Rational® Integration Tester is displayed and the newly created stub is displayed under the relevant logical resource on the Test Factory component tree. If you created a stub for multiple operations, the stub is displayed under each applicable operation.
If you selected the Open resource after finish check box in the Summary window, the stub is opened in the Stub Editor.