Creating logical RabbitMQ transport connections
In Rational® Integration Tester, tests and stubs reference the logical resources in a project. Therefore, you must create at least one logical RabbitMQ transport connection for each RabbitMQ transport to be used.
Before you begin
You must have at least one environment in your project. If there are no environments, you must create one.
Procedure
- Open the Logical View of the Architecture School perspective.
-
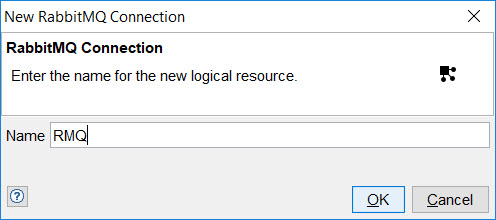
On the toolbar of the Logical View, click .
The New RabbitMQ Connection dialog is displayed.
-
In the Name field, enter a name for the connection.
-
Click OK.
The New RabbitMQ Connection dialog is closed and the new logical RabbitMQ connection is displayed in the canvas of the Logical View.
- When a logical connection is created, a new physical resource is also created and bound in this environment. To view or edit this physical resource, right-click the new connection and click Physical Resource.
-
Double-click the new logical RabbitMQ
connection.
The RabbitMQ Connection dialog is displayed.
Alternatively, right-click the logical RabbitMQ connection, and then click Open in the menu that is displayed.
-
To associate the new logical RabbitMQ
connection with a different logical resource, complete the following tasks:
- Optional:
Click the Bindings tab. Alternatively, click in the menu bar to open the Environment Editor window and click
the Bindings tab to modify the bindings of the selected environment.
If you did not bind the RabbitMQ connection to a physical RabbitMQ broker, UNBOUND is displayed under Binding and you must complete the following tasks:
- Optional:
To add a log file for the new logical RabbitMQ
connection, click the Monitoring tab.
You can monitor the log file during the execution of a test that involves the new logical RabbitMQ connection.
- Optional: To enter additional information about the new logical RabbitMQ connection, click the Documentation tab. Although this additional information is optional, it might help with the maintenance of the resources in the project or help future users of the project.
- Optional: To specify one Queue that should be recorded when using a RabbitMQ broker as a source, click the Recording tab.
- Click OK.
Results
The new logical RabbitMQ connection is added to the project.