Specifying a file grouping by using fixed width layouts
Fixed width record layouts contain one or more fields that can be optionally divided into logical groups. The groups are not displayed in the finished layout or schema, but they can be used to organize the fields of the layout.
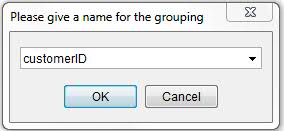
To add a grouping to the layout, click the Insert grouping button in the New Record Layout window. When prompted, provide a name for the group by entering it in the field, or select a recently used name by clicking the dropdown arrow.

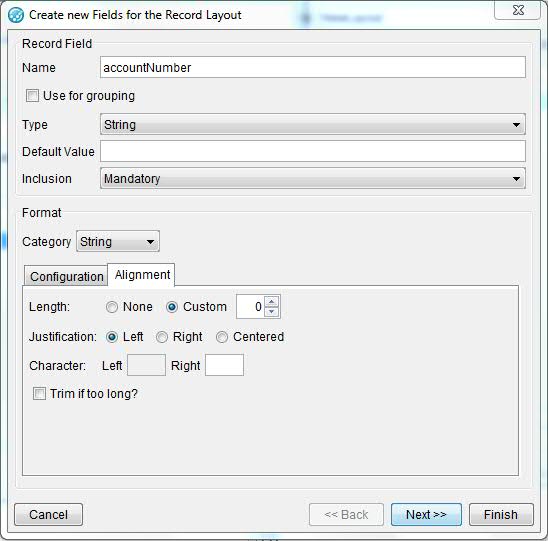
To add a field to the layout, click the Add fields button. The field configuration window is displayed.

Enter the following basic details about the field in the Record Field area:
- Name: The field name to be displayed in the layout.
- Use for grouping: The checkbox to be enabled to create a grouping in the layout.
- Type: Type of the record field
- Default Value: An optional default value that can be applied to the field if there is no value available in the message.
- Inclusion : A value to indicate whether the field must appear in the message or if it is optional.
In the Format area, you can specify the formatting options for the field value. For more information, see Formatting field values.
To create the field and return to the New Record Layout window, click Finish.
To create the field and continue with creating another field in the same window, click Next. Click Back to return to the previous field details again.
The following details of each field can be modified in the New Record Layout window:
| Column name | Description |
|---|---|
| Name | The name of the field. |
| Repeating | If the selected field contains repeating elements within the
grouping, they can be selected by clicking the |
| Default | Enter a default field value to be applied in a message if it does not have any other value. |
| Inclusion | Specify whether the field is required to be included (Mandatory) in the message or not (Optional). |
| Type | Select the field type from the list of available field types in Rational® Integration Tester. |
| Length | Enter the number of characters permitted in the message that
is designated for the selected field. Note: The Record Layout schema
uses this value to calculate the length of the data that the field
can hold when the record is filled from memory. Additional data from
the memory is shifted to the next available field, and remaining data
is any, is saved in a field named "unexpected". For example, consider
a message with two fields: If you pass 12345 to this
message, you would see the following result:The However, when you publish a record layout message, this restriction does not apply. If a field exceeds the custom length, but the Trim if too long option is not selected as the field value format, the field contents are not truncated. |
| Position | Indicates the position in the message (starting from zero) of the selected field, which is based on the size of all preceding fields. |
| Align | Select the alignment of the data for the selected field in the message (left, center, or right). |
| Padding Left | Enter the character that is used in the message as padding to the left of the field data (for right- or center-aligned fields). |
| Padding Right | Enter the character that is used in the message as padding to the right of the field data (for left- or center-aligned fields). |
| Format | Click the |
Selected fields and groupings (one or more) can
be removed from the layout by clicking the Remove fields ![]() icon. To move one or
more selected fields or groupings up or down within the layout, click
the Move up
icon. To move one or
more selected fields or groupings up or down within the layout, click
the Move up![]() or Move down
or Move down ![]() icon.
icon.
The editable properties for each field can be modified by pressing the F2 key. You can move around the cells within the layout by using the arrow keys. To apply a change in the current cell, press Enter. To apply a change and move to the next cell to the right, press Tab. To move to the cell below the current one, press Enter.
After you have created the layout and configured
it, click the Save icon ![]() or press Ctrl
+ S to save the layout.
or press Ctrl
+ S to save the layout.