Jenkins Agent Dockerfile
This chapter covers the complete, two-part process for creating and configuring a custom dynamic Jenkins agent.
- Part 1 explains how to write a Dockerfile to build a custom agent image that contains all the specific tools our pipeline needs (Git, gcloud, kubectl, and Docker).
- Part 2 explains how to configure the Jenkins UI to use this custom image, allowing our pipelines to run in a clean, isolated environment with all the correct tools.
The Role of a Dynamic Jenkins Agent
Instead of manually installing gcloud, kubectl, and docker on a permanent agent machine, we define a custom Docker image that has them pre-installed. When a pipeline runs, Jenkins will:
- Start a new, temporary container from our gcp-jenkins-agent:latest image.
- Run all pipeline stages inside this clean container.
- Destroy the container when the pipeline finishes.
This ensures every build has a clean, identical environment with the correct tool versions.
Dockerfile for gcp-jenkins-agent:latest
# Start from the official Jenkins agent image with JDK 17
FROM jenkins/inbound-agent:latest-jdk17
# Switch to root user to install new software
USER root
# Install dependencies and Git
RUN apt-get update && apt-get install -y \
apt-transport-https \
ca-certificates \
curl \
gnupg \
lsb-release \
git \
&& apt-get clean && rm -rf /var/lib/apt/lists/*
# Install the Docker CLI (Client only)
# We don't need the full Docker engine, as we will mount the host's Docker socket
RUN curl -fsSL https://download.docker.com/linux/debian/gpg | gpg --dearmor -o /usr/share/keyrings/docker-archive-keyring.gpg
RUN echo \
"deb [arch=$(dpkg --print-architecture) signed-by=/usr/share/keyrings/docker-archive-keyring.gpg] https://download.docker.com/linux/debian \
$(lsb_release -cs) stable" | tee /etc/apt/sources.list.d/docker.list > /dev/null
RUN apt-get update && apt-get install -y docker-ce-cli
# Install Google Cloud SDK (gcloud)
RUN curl -sSL https://sdk.cloud.google.com | bash -s -- --disable-prompts --install-component-dir=/usr/local/gcloud
# Add gcloud components to the system PATH
ENV PATH $PATH:/usr/local/gcloud/google-cloud-sdk/bin
# Install kubectl
RUN curl -LO "https://dl.k8s.io/release/$(curl -L -s https://dl.k8s.io/release/stable.txt)/bin/linux/amd64/kubectl" && \
install -o root -g root -m 0755 kubectl /usr/local/bin/kubectl
# Switch back to the default jenkins user
USER jenkinsHow This File is Used
- A system administrator saves the code above as Dockerfile in a new directory.
-
They run docker build to create the image:
docker build -t gcp-jenkins-agent:latest .
- They push this image to a Docker registry (like Docker Hub or Google Artifact Registry) so the Jenkins controller can access it.
File Explanation
| Command | Purpose |
| FROM jenkins/inbound-agent... | Starts from the official Jenkins agent image, which knows how to communicate with the Jenkins controller. Includes JDK 17. |
| USER root | Switches to the root user to get permission to install software. |
| RUN apt-get install ... | Installs basic utilities (curl, git) needed for the next steps. |
| RUN ... install docker-ce-cli | Installs the Docker Command Line Interface (CLI). This allows the container to run docker commands. |
| RUN ... gcloud | Installs the Google Cloud SDK (gcloud), which is needed for GCP authentication and GKE/Artifact Registry commands. |
| ENV PATH ... | Adds the gcloud tools to the system's PATH so they can be run from anywhere. |
| RUN ... kubectl | Installs the Kubernetes command-line tool (kubectl), which is needed to deploy to the GKE cluster. |
| USER jenkins | Switches back to the standard jenkins user for security, as the pipeline itself does not need root permissions. |
Build the image: docker build -t my-custom-jnlp-agent:latest .
Push it to your registry (or just have it on the Docker host).
Step 1: Install the Docker Plugin
First, you must install the plugin that allows Jenkins to manage Docker.
- Go to Manage Jenkins➔Plugins.
- Click the Available tab.
- In the filter search box, type Docker.
- Select the checkboxes for the Docker and Docker Pipeline
plugins.
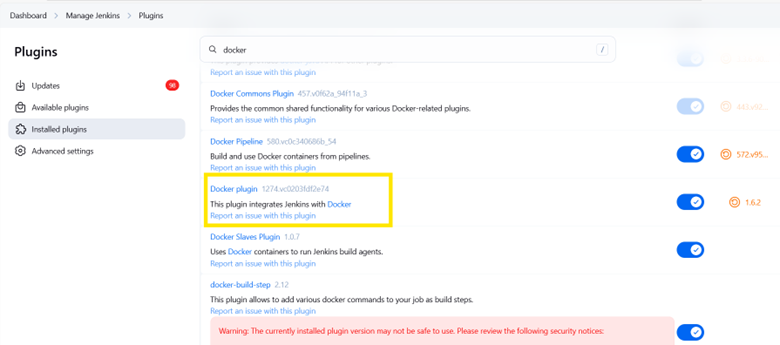
- Click Install and restart Jenkins if prompted.
Step 2: Navigate to the Cloud Configuration
- Go to Manage Jenkins➔Clouds.
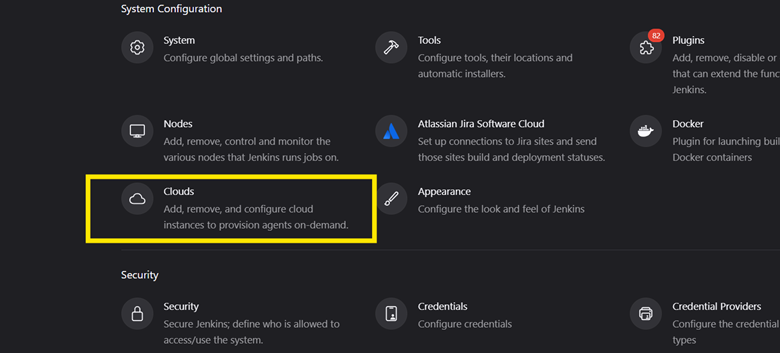
- Click Add a new cloud (or "Configure Clouds" if you see that).

- Select Docker from the list.
Step 3: Configure the Docker Cloud Connection
This section connects Jenkins to the Docker daemon on your host.
- Name: Give your Docker cloud a descriptive name (e.g., my-docker-host).
- Docker Host URI: This tells Jenkins where to find the Docker daemon.
- If Docker is on the same machine as Jenkins: Use unix:///var/run/docker.sock
- If Docker is on a remote machine: Use tcp://<your-host-ip>:2376
(you must have the Docker API exposed on that port).
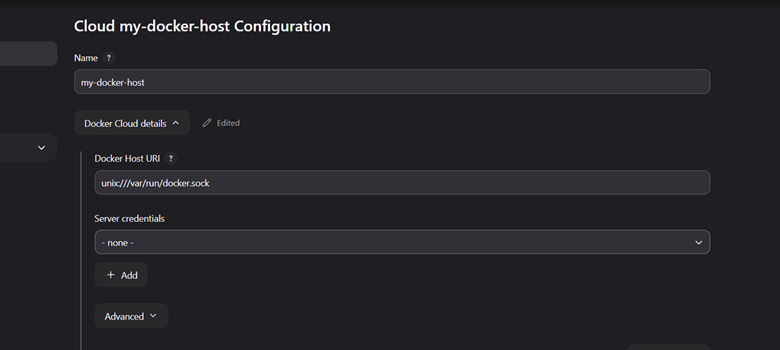
- Click the Test Connection button. You should see a success message with
the Docker version.
- If it fails: You may have a permissions issue. On the Docker host machine, run sudo usermod -aG docker jenkins to add the jenkins user to the docker group, then restart Jenkins.
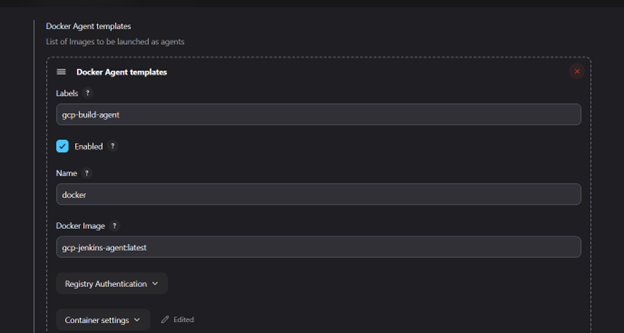
Step 4: Create a Docker Agent Template
This is the most important part. You are defining a template for the agent containers your pipelines will run in.
- In the same configuration screen, find the Docker Agent templates section.
- Click Add Docker Template.
- Fill out the agent details:
- Labels: This is the critical field. Give it a name that your pipelines
will use to request this agent.
- Example: docker-agent
- Enabled: Check this box.
- Docker Image: The image to use for the agent. This image must have Java
installed.
- gcp-jenkins-agent:latest
- Remote File System Root: The workspace for Jenkins inside the
container.
- Standard Example: /home/jenkins/agent
- Labels: This is the critical field. Give it a name that your pipelines
will use to request this agent.
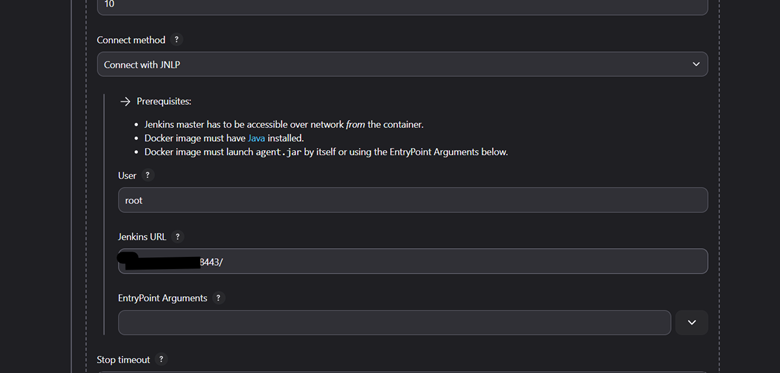
Connect method: Select Connect with JNLP.
Docker Image: Use an image built for JNLP.
- Example: jenkins/inbound-agent:latest-jdk17
User: Set this to root (this is required only if you also mount the Docker socket).
Jenkins URL: In which Jenkins running
EntryPoint Arguments: Leave blank.
Step 5: Save and Use
- Click Save at the bottom of the page.
- You can now use your agent in a Jenkinsfile.