Splitting a test
After you record a test, you can split it into smaller tests. By splitting a test, you can create modular building blocks of smaller tests and combine them to make bigger tests. The original test is unchanged.
About this task
Procedure
- In the Test Navigator, browse to the test and double-click
it.The test opens.
- Select one or more elements in the test for splitting into
a new test.You must select contiguous elements. You can select elements, except for variable containers, that are immediate children of the root node of the test.
- Right-click the selected elements, and then select Save Selection As New Test.
- In the Save Selection as New Test window,
type a file name for the new test, and optionally provide a description
or comment for the split test.
- Select Also use description text for comment at beginning of each test to add the Description/comment field as a comment at the beginning of the split test.
- Select Mark the selection in the editor to mark the selection in the original test with marks of the form [N-> where N is a positive integer that corresponds to the number of saved selections. For example, the first time you save a selection as a new test, the selection in the original test is marked with this identifier:[1->. If you save three selections, the original test is marked with these identifiers: [1->, [2->, and [3->.
- Click Next.
Selecting Mark the selection in the editor makes it easier to split a test into multiple parts. The marks in the editor are removed when you close the test. You cannot save marked test elements. Right-click and select Clear Range to remove the marks if you want to save the selected test elements again. - Optional: On the next page of the Save
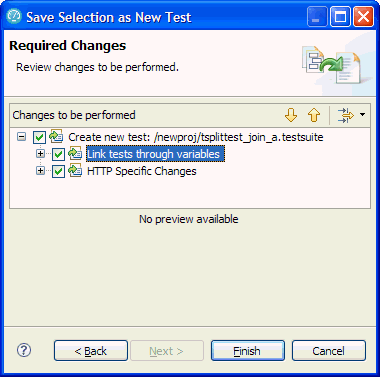
Selection as New Test wizard, examine the changes to be
performed as a result of the split.Typically, you leave Link tests through variables and HTTP Specific Changes selected; clearing these options might make a split test unusable or produce unpredictable results. However, you can clear specific Link tests through variables boxes if you do not want certain data to be correlated between the tests.

- Click Finish.
Results
The new test is created from the selected elements. The test variables that are created by splitting a test are listed in the Variables Created by Split Test container in the new test. For best results, open the Variables Created by Split Test container in the new test and make sure that the variables are created and assigned with values by a test that is executed before the newly split test. For more information on test variables, see About test variables and Declaring and assigning test variables.
The original test is marked if you select the Mark the selection in the editor option. To remove the marks, right-click the selected elements in the original test and select Clear Range. You are also prompted to delete the new test. Click Yes to delete the new test or No to preserve it.
Example
- Logging on to a server.
- Creating an entry on the server and removing the entry.
- Editing an entry, validating that the change occurred, and restoring the entry.
- Logging off of the server.
- Open visitIBM and select the logon actions. Name the new test Logon, which contains the Logon actions.
- Select the create actions. Name the new test Create.
- Select the edit actions. Name the new test Edit.
- Select the logoff actions. Name the new test Logoff.
Be aware, however, that when you split the tests, the Create test might have initialized variables that the Edit test uses. Therefore, if you reverse the order during the run (that is, run the Edit test before the Create test), make sure that the variables that the tests share are initialized and set correctly.