Creating a function plug-in without Eclipse
You can use Eclipse IDE to easily create the plug-ins. Alternatively, you can build a function by using the Sun Java™ 6 SDK.
About this task
For information about how to create a plug-in with Eclipse, see Create the plug-ins in Eclipse.
C:\Program
Files\IBM\RationalIntegrationTester\
, that the Installation Manager shared resources
directory is installed in C:\Program Files\IBM®\IBM®IMShared\, and that you are using a Windows™
Command Prompt. However, running the commands from a Linux™
Terminal is also supported and the Installation Manager shared resources directory is installed on
Linux™ systems in /opt/IBM®/IBM®IMShared/.To create a function without Eclipse, do the following steps:
Procedure
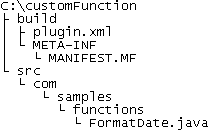
- Create a folder to develop the custom function. For example: C:\customFunction.
- Create folders for the source and the build output. For example: C:\customFunction\src and C:\customFunction\build.
- Copy the plugin.xml file and the
META-INF directory from
C:\Program Files\IBM\RationalIntegrationTester\examples\FunctionsSamplePlugininto the build directory. Both the plugin.xml file and the META-INF directory must be copied to the same target directory (C:\customFunction\build). - Create the required directory structure under src to
contain your custom function code. For information about how to write your custom function code, see
Implementing the function class. If you have existing code, copy the root package and all sub packages under the
src folder. For example:
C:\customFunction\src\com\samples\functions\FormatDate.java.
An example directory structure follows:

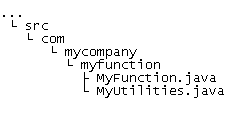
Except in the src folder, if you compile your own function, you have your own Java™ classes in a similar folder hierarchy. For example:

- In your command prompt or terminal, from the
C:\customFunction\src folder compile the custom function into the
build directory, such as by running the following command:Note: Run the
javacexecutable from the Java Development Kit (JDK). If the commands shown do not find that executable, add the full path to the executable's location to the beginning of each command.javac -d ../build -classpath .;"C:/Program Files/IBM®/IBM®IMShared/plugins/*" com/samples/functions/FormatDate.javaNote: If the source contains multiple Java files, you must specify each file in the command. For example, if you use the second directory structure above, the command is:javac -d ../build -classpath .;"C:/Program Files/IBM®/IBM®IMShared/plugins/*" com/mycompany/myfunction/MyFunction.java com/mycompany/myfunction/MyUtilities.javaor
javac -d ../build -classpath .;"C:/Program Files/IBM®/IBM®IMShared/plugins/*" com/mycompany/myfunction/*.javaOn a Linux™ systems, the command is:javac -d ../build -classpath .:"/opt/IBM®/IBM®IMShared/plugins/*" **/*.java - Edit MANIFEST.MF, which is in the
META-INF directory under the build directory, for example,
META-INF/MANIFEST.MF and change the following values:
Value Change to Bundle-Name Enter a descriptive name for the plug-in (for example, Format Date Function). Bundle-SymbolicName Enter a unique ID that describes your plug-in. This ID must be different from any other plug-in, as two plug-ins with the same ID cannot be loaded at one time. Leave the "singleton:=true" part untouched. Bundle-Vendor Enter your companys name or some other provider description. An example of a manifest file follows:Manifest-Version: 1.0 Ant-Version: Apache Ant 1.7.0 Created-By: 10.0-b19 (Sun Microsystems Inc.) Bundle-ManifestVersion: 2 Bundle-Name: The Function That Does Exactly What I Need Bundle-SymbolicName: com.mycompany.myfunction;singleton:=true Bundle-Version: 1.0.0 Bundle-Vendor: My Company Import-Package: com.ghc.ghTester.expressionsReplace the values for
Bundle_Name, theBundle-SymbolicName, and theBundle-Vendorwith your own. TheBundle-SymbolicNamevalue usually, but does not have to, match the Java™ package name in which the function Java™ classes are located. - Open plugin.xml available in the build directory by using any text editor and update the values as described in Configuring an extension element.
- In your command prompt or terminal, from the
c:\customFunction\build directory create a JAR file that contains your custom
function classes, MANIFEST.MF, and plug-in.xml. For
example, you can use the following command: Note: Run the
jarexecutable from the Java Development Kit (JDK). If the commands shown do not find that executable, add the full path to the executable's location to the beginning of each command.jar cvfm custom-function-plug-in_1.0.0.jar META-INF\MANIFEST.MF com plugin.xmlNote: You can choose any name for your JAR file, but you must follow a convention that prevents conflicting names. - After your function is implemented (as described in Implementing the function class) and
a plug-in is generated for your function (as described in this topic), you need to tell
Rational® Integration
Tester about it. Copy the new JAR file into the
Functionsfolder of your Rational® Integration Tester project.When finished, follow the instructions to load the function into Rational® Integration Tester as described in Configuring the function in Rational Integration Tester.
Note: An example of how the plug-in looks can be found underC:\Program Files\IBM\RationalIntegrationTester\examples\FunctionsSamplePlugin.