Lesson 2: Adding a verification point
In this lesson, you will learn how to add a verification point to a test step.
Before you begin
About this task
Verification points verify that an expected behavior occurred during a run, or verify the state of a control or an object. When you create a verification point, you capture information about a control or an object in the application to establish that as baseline information for comparison during playback. When you run a test, the property is compared to see whether any changes have occurred in the application.
Verification points are useful for identifying possible defects when an application has been upgraded. An error is reported if the expected behavior did not occur. You can create verification points for any object properties, such as label, color, and count, and you can verify that an object property is enabled, that it has focus, whether it is clickable, and other such states.
There are many ways to create a verification point. You can create it from the Test Contents area of the editor, from the screen capture in the SmartShot View, or from the Properties area in the SmartShot View. This tutorial shows how to create a verification point by dragging the content from the Properties area to the Test Contents area of the editor.
Procedure
- Select Click on Hyperlink whose content is Pricing test step in the test editor. The corresponding screen capture and its properties are displayed in the SmartShot View.
-
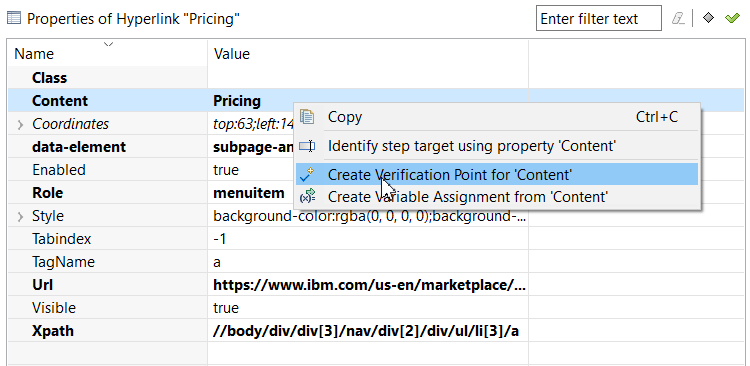
In the Properties area, right-click the Content name with the value of 'Pricing',
and select 'Create verification point for Content'. Alternatively, you can create the
verification point from Pricing image in the SmartShot area.

- To save the changes, click .
Results
The verification step is created. 
In this lesson, you have learned how to create a verification point. The test will verify that the value of the product added to the shopping cart is equal to the value in this verification point.