Running automated tests with containerized workbench and agents from Docker
To simplify the deployment piece of Continuous Testing, you can use built Docker images to deploy the workbench and the agents and start testing in no time. You need not install the workbench and the agents on different machines. You can deploy the Docker images and use Docker commands to play back tests.
Before you begin
You must have configured the Docker container. See Configuring Docker containers.
You must already have exported the test assets to a location from where Docker can import them. For information about exporting the test assets, see Copying test assets with dependencies.Note: The version
number of the container images and the desktop products must match. If you have previous
version of the container image, uninstall it and install the current version. To uninstall
the image, use these commands:
- Stop the container by running
.docker stop "CONTAINER ID" - Uninstall the image by running
.docker rmi -f "image ID"
Procedure
-
To run the test without using any agents, start the container:
$ docker run --rm -e RATIONAL_LICENSE_FILE=PORT@HOST -v hostTestAssets:/containerTestAssets -v hostImportedData:/containerImportedData imageName:imageVersion cmdline -workspace //containerImportedData/workspace -project projectName -schedule testName -results autoResults -stdout -exportlog /containerPathExtracted/testlog.txtCommand Description --rm Removes the container after the run completes. -e Sets environment variables. RATIONAL_LICENSE_FILE=<PORT>@<HOST> Specifies the port number of Rational License Key Server, usually 27000, and the server IP address. The floating license for the product and VT-packs must be on the license server. hostTestAssets:/containerTestAssets Specifies the folder location on the host machine and the container containing the compressed test assets (Zip format). Use both the locations to map one or more shared volumes to transfer data such as test assets, logs, and execution results between the host and the container. hostImportedData:/containerImportedData Specifies the workspace location on the host machine and the container containing the test assets that are not compressed. Results from the test execution are saved to the directory you specify on the host machine. TEST_IMPORT_PATH=<PATH> Specifies the location of the compressed test assets to be imported into the container. The location path is on the container side and not the host. For example, /containerTestAssets/archiveName.zip. The volume and path names are user defined and should be consistent. imageName:imageVersion Specifies the name of the image and its version to run. cmdline Specifies the existing command line arguments to define the location of the workspace, project name, test or schedule name, results file name, and the location of the exported logs. After the test run completes, check the hostImportedData on the host machine to view the exported log. -
To run the tests on containerized agents, load the agent images into the Docker
repository:
tar --wildcards --to-command='docker load' -xzf <workbenchImageName> 'images/'*For example, the workbench image name could be ibm-rtw-<versionNumber>.tar.gz.
When the image is loaded, the following message is displayed - Loaded image: imageFileName:versionNumber -
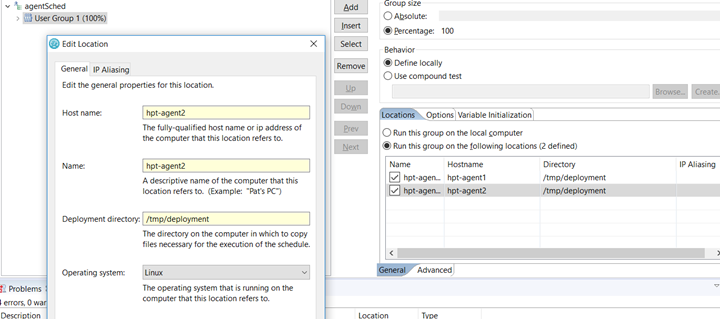
Specify the agent details in the workbench. You can do this in one of the two ways:
- Specify all of the details in the local workbench and export the test assets to the directory that will be used by the containers to choose the tests.
- Bring up the workbench UI in the container to specify the agents in the schedule editor. To bring up the workbench UI in the container, install and configure an X11 server such as Xming on your host machine and specify -e DISPLAY=<IP>:0.0 parameter in the docker run command. The IP is the IP address of your host machine. For information about how to install and configure Xming, see its product documentation.
Note:- If you use 'localhost' instead of the IP address with the default Docker settings, the container will forward the display to itself. If your IP is assigned via DHCP it is liable to change and you will need to update your container’s environment variable accordingly.
- Do not use underscores in the agent names.

-
To map a User Group with a specific agent, assign a static IP to the agent. To assign an IP to
the agent, use the NODE_IP parameter along with the docker
run command.
Note: Ensure that this IP matches with the IP specified for the Location asset in the workbench.
-
Initiate the test runs against the agents in one of the following ways:
- Verify whether the schedule has completed successfully. If you used an option such as -exportlog to output results to the shared volume, check the corresponding directory on your host machine that was mapped to hostImportedData to retrieve the exported data.
What to do next
docker stop containerIDIf you used Docker Compose tool
to run the tests, you can stop the agents when the workbench container exits by
running
docker-compose up --abort-on-container-exit