Editing and viewing component details
You can modify a component's name, parent, bindings, and description. You can also expand and collapse components. If an infrastructure component is bound to a physical resource in the current environment, you can view the component's physical resources.
About this task
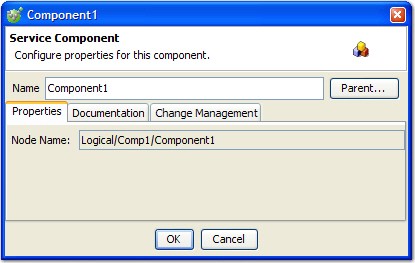
Viewing the component details
Procedure
- Double-click the component or right-click
it and select Open from the menu. The component
editor is displayed.

- The component name is displayed, with more
information in various tabs, as follows:
Field Description Node Name The name of the component (see Changing a component name). Type For infrastructure components, the type of the component. Parent Click this button to change the components parent (For more information, see Changing a components parent.) Properties Resource Path The fully qualified name of the component, including its location in the project hierarchy. Bindings (Infrastructure Components only) Environment The name of the environment (one row is shown for each environment so that a binding can be configured for each one). Binding The physical resource to which the infrastructure component is bound in the corresponding environment. Documentation Description The description of the component (see Changing the description of a components). Created The date and time when the component was created, as well as the ID of the user who created it (in the By field). Updated The date and time when the component was last updated, as well as the ID of the user who made the update (in the By field). Source Change Management Override Lets users specify a different change management integration than one inherited from another resource (higher up the project resource tree) or the default integration that is specified in the Project Settings. For more information, see HCL OneTest API and change management tools. - When finished, click OK to
save any changes and close the editor. Otherwise, click
 or Cancel to
close the editor without saving changes.
Changing a component name
Procedure
- Use the component editor or use the Rename
option.
- To open the component editor, double-click the component or right-click it and select Open from the menu. Enter a new name for the component in the Name field.
- Right-click the component, select Rename from the menu, and enter a new name for the component in the Rename to dialog.
Note: The rename check is case-insensitive. If you only change the capitalization of the resource name, the OK button in the Rename dialog box is not enabled. - Click OK to save your changes and close the editor/dialog.
Changing a components parent
Procedure
- Open the component editor (see Editing and viewing component details).
- Click the Parent button.
The Select a Resource dialog is displayed.
- Locate and select the new parent component.
- Click OK to save your changes and close the dialog.
Changing component bindings
About this task
For Infrastructure Components, you can configure bindings in one or more environments in the component editor, by using the menu, or in the environment editor (see Environment properties, bindings, and tasks).
- Open the component editor (see Editing and viewing component details) and select the Bindings tab.
- Click in the Binding field next to the wanted environment and select the physical resource to bind to in that environment.
- Click OK to save your changes and close the dialog.
- Right-click the wanted component and place the cursor over the Set Binding In option. A submenu is displayed for each environment that was created. The environment that is selected is displayed in bold.
- Select the name of the environment where you want to set the binding.
- If any are created, select the physical resource to which the selected component is to be bound. If wanted, or if no physical resources of the selected type exist, you can create a new physical resource by selecting the Create new <resource type> option.
Changing the description of a components
Procedure
- Open the component editor (see Editing and viewing component details).
- Click the Documentation tab.
- Enter a new description for the component in the Description field.
- Click OK to save your changes and close the editor.
Expanding and collapsing components
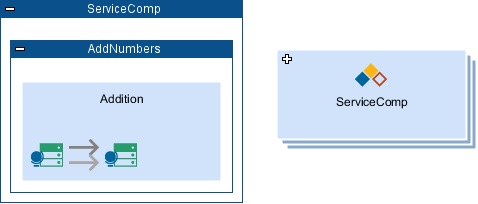
You can view Service components in an expanded (default) or collapsed state.
About this task
To change the current state of a component, simply click the expand/collapse icon (in the title bar). The image illustrates the same component in its expanded and collapsed states:

Viewing a components physical resource
About this task
If an infrastructure component is bound to a physical resource in the current environment, you can open the physical resource for viewing or editing by right-clicking the component and selecting Physical Resource from the menu.