Debugging message-based stubs
Use the Message Differences window or options available within the stub console display to debug message-based stubs.
Before you begin
Message-based stubs include an Events page that lists model
messages that the stub attempts to match to incoming messages. Each
of these model messages is considered a case, such as
you would find in a switch statement in Java™. A Guard field offers
the option to mark a model message as containing an Expression,
or as No Match, which means that the message
is to be used as a default if no other match is found. These messages
are read in order, and the No Match option
is available for the last message in the list only.
When you run a test against a stub, an entry is displayed on the stub console when a match is found. You can right click the entry for a list of options, as shown in the following illustration.
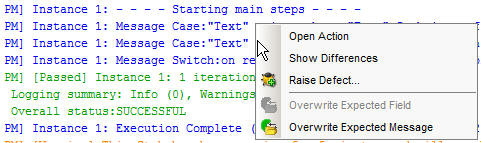
If you click Show Differences, the Message Differences window is displayed. See The Message Differences window for stubs in this topic. For the other options, see Console options in this topic.
If no match is found and you have a default case (a message with a No Match guard), an entry is displayed for the default case on the stub console. You can right click the entry for a list of options, as shown in the following illustration.

If you click Show Message, the Message Differences window is displayed. See The Message Differences window for stubs in this topic. For the other options, see Console options in this topic.
The Message Differences window for stubs
Before you begin
Use the Message Differences window to debug any message-based stubs that generate error messages on the Test Lab perspective Console window. Debug the stub to determine why no events were matched.
- You do not have to move from the Test Lab perspective to the Test Factory perspective and analyze each expected message to determine why it did not match any of the events.
- You have access to the received messages for side-by-side comparison with all expected messages from the events associated with the relevant operation in the currently selected stub.
Procedure
- To debug a message-based stub that is taking the default
case when it should match a particular event, click the default case
output in the stub console, or the failed validation output in the
console window for the Test Lab perspective.The Message Differences window is displayed.Note: You can use all Rational® Integration Tester perspectives while the Message Differences window is displayed. However, if you use the Stub Editor (or the Test Editor) to modify a stub (or a test) while also using the Message Differences window to modify the same resource, there will be two sets of pending changes to that resource. Therefore, when you attempt to close the Message Differences window, Rational® Integration Tester will prompt you to select the set of changes you want to keep.
The Message Differences window collects all of the events associated with the relevant operation in the stub into one location. The events are displayed on the left side of the window and the message received is displayed on the right side of the window.
- Click the navigation buttons under Expected Message on the upper-left side of the window to move up and down through the events.
- Analyze any errors on the left side of the Message Differences window.
- Use the buttons under Repair and Action on
the upper-right side of the Message Differences window to perform
any of the following actions:
- Edit or repair any messages
- Close and run the stub again
- Raise a defect, if necessary
For more information about these buttons, refer to Integration Tester Reference.
- Click Close and Re-run to save your
changes and to run the stub again.
Alternatively, if running Rational® Integration Tester from memory, click Apply to save your changes and to run the stub again.
Console options
About this task
The following options are available when you right click a message case or default case message in the stub console.
| Option | Case | Description |
|---|---|---|
| Open Action | Message and Default | Switches to the Test Factory perspective and opens the stub for editing. |
| Raise Defect | Message | See Creating defects in the integrated change management tool. |
| Overwrite Expected Field | Message | Replaces the value of the specified field in the stub with the value from the incoming message. This option is available when the expected message differs from the incoming message in only a single field. |
| Overwrite Expected Message | Message | Replaces the model message in the stub with the incoming message. |
| Enhance stub to support this request | Default | Adds the incoming message to the Events list in the stub. |