Running tests with containerized agents
When you have a local workbench, instead of installing the agents on different machines and locations, you can deploy the containerized agents to generate the load.
Before you begin
You must have configured the Docker container. See Configuring Docker containers.
About this task
Typically, when the agents are installed, you specify the workbench host name and port number to establish the connection with the workbench. If you use containerized agents, they are already installed. Therefore, you specify the connection information during the run.
To uninstall the image, you must stop the
container by running the docker stop
"CONTAINER ID" command, and then run the
docker rmi -f "image ID" command
to uninstall the image.
Procedure
-
Start the container instance of the agent by
running the following command:
$ docker run -dit --rm -e MASTER_NAME=Workbench_name or IP -e MASTER_PORT=port_number -e AGENT_NAME=Agent_name -e AGENT_IP=IP_address imageName:imageVersionTable 1. Description of parameters Command Description -dit Specifies that the agent container runs in the background. --rm Specifies to clean up the container and remove the file system when the container exits. MASTER_NAME Specifies the IP or host name of the workbench. MASTER_PORT Specifies the port number of the workbench. If you use the default port number of 7080, this command is optional. AGENT_NAME Optional: Specifies the name of the agent that report to the workbench. AGENT_IP Optional: Specifies the IP address of the agent that report to the workbench. imageName:imageVersion Specifies the name and version of the image. -
Click the Agent Status
icon
 from the product to verify the two
container agents are polling the workbench.
from the product to verify the two
container agents are polling the workbench.
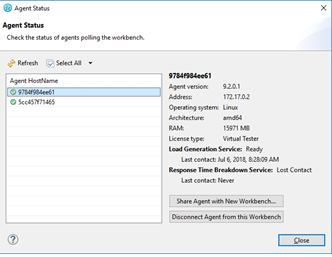 Note: The agent host names should match the IDs of the containers running in Docker. Make a note of the IP address of the each agent since they must be used when creating the agent locations.
 - In the schedule editor, create a new location test asset for each container agent so that the selected User Group runs on two agent locations.
-
Run the schedule.
The deployment step could result in the schedule remaining in the
Launching
state for several minutes.