Spring Framework for EGL REST Services
Representational State Transfer (REST) web services are services that can be invoked using HTTP. The service provides access to a web resource that is specified in a URI. The service’s operations correspond to HTTP operations, four of which are supported in EGL:
- GET – for retrieving resources
- POST – for creating resources
- PUT – for creating or updating resources
- DELETE – for deleting resources
EGL provides a common framework for applications to be available as REST web services. This framework has three components:
- An EGL service part, which describes the operations made available with REST and the parameters that are passed.
- An EGL Deployment Descriptor, which describes how to deploy the EGL REST service to a target platform.
- The EGL serviceLib Library, which provides a set of functions for customizing and processing the REST invocation and response.
In EGL, a REST service’s URI is split into two components:
- A base URI, which is the leading part of the URI and is usually the address of the REST service
- A URI template which is the trailing part of the URI and is usually the name of the service and the parameters of the service.
At run time, the base URI and URI template are concatenated to form the complete URI for invocation. This means that it is also possible to have the full URI in either the baseURI or the URITemplate.
For example, if a REST service has a URI as follows:
http://www.example.com/myservice?q={myquery}&numReturnRows={rowCount}
Then the base URI is
http://www.example.com and the URI Template is /myservice?q={myquery}&numReturnRows={rowCount}.
Prerequisites
- IBM Business Developer(IBD)
- Knowledge of developing services using EGL and IBD.
- Knowledge of Spring Framework and OpenAPI/Swagger documentation
EGL Annotations For REST Services
- @GetRest
- @PutRest
- @PostRest
- @DeleteRest
The value of the parameter empno is used to create the full URI needed to invoke the REST operation GET (EGL getEmployee function).You can use any number of parameters in the uriTemplate, but only a maximum of one parameter can be used as the resource representation that is sent to and received from the REST service. This parameter is placed in the body of the HTTP request and response. For this example, we are sending and receiving emp as the representation resource.
package services;

record employee type sqlrecord{description = "everything you need to know about an employee",tableNames =[["SAMP.EMPLOYEE"]
            ], fieldsMatchColumns = yes,keyItems = [empno]}

    empno string{column = "EMPNO", maxLen = 6};
    firstnme string{column = "FIRSTNME", sqlVariableLen = yes, maxLen = 12};
    midinit string{column = "MIDINIT", maxLen = 1};
    lastname string{column = "LASTNAME", sqlVariableLen = yes, maxLen = 15};
    workdept string{column = "WORKDEPT", isSqlNullable = yes, maxLen = 3};
    phoneno string{column = "PHONENO", isSqlNullable = yes, maxLen = 4};
    hiredate date{column = "HIREDATE", isSqlNullable = yes, description = "employee's hire date"};
    job string{column = "JOB", isSqlNullable = yes, maxLen = 8};
    edlevel smallInt{column = "EDLEVEL"};
    sex string{column = "SEX", isSqlNullable = yes, maxLen = 1};
    birthdate date{column = "BIRTHDATE", isSqlNullable = yes};
    salary decimal(9, 2){column = "SALARY", isSqlNullable = yes};
    bonus decimal(9, 2){column = "BONUS", isSqlNullable = yes};
    comm decimal(9, 2){column = "COMM", isSqlNullable = yes};
end

service service1{Title = "Employee Service", description = "Operates On The Employee Database", version = "1.0.0"}

    function getEmployee(empno string in) returns(employee){tags =[
                                "employeeRecord", "retrieveEmployee"
                        ], description = "gets an existing employee", @GetRest{uriTemplate = "/employee/{empno}", responseFormat = JSON}}

        myemp employee;
        myemp.empno = empno;
        get myemp;
        if(myemp is norecordfound)
            nfresp HttpResponse;
            nfresp.status = 404;
            nfresp.body = "Employee " + empno + " Not Found";
            serviceLib.setRestResponse(nfresp);
        end
        return(myemp);

    end

    function addEmployee(emp employee in){tags =["employeeRecord",
                                "modifyEmployee"
                        ], description = "adds a new employee", @PostRest{uriTemplate = "/newemployee", requestFormat = JSON}}

        add emp;
    end

    function updateEmployee(emp employee in){tags =["employeeRecord",
                                "modifyEmployee"
                        ], description = "updates an existing employee", @PutRest{uriTemplate = "/changeemployee", requestFormat = JSON}}

        tempEmp employee = emp;
        get tempEmp forUpdate;
        if(tempEmp is norecordfound)
            nfresp HttpResponse;
            nfresp.status = 404;
            nfresp.body = "Employee " + tempEmp.empno + " Not Found";
            serviceLib.setRestResponse(nfresp);
        else
            replace emp noCursor;
        end

    end

    function deleteEmployee(empno string in){tags =[
                                "employeeRecord", "modifyEmployee"
                        ], description = "deletes an existing employee", @DeleteRest{uriTemplate = "/removeemployee/{empno}"}}

        myemp employee;
        myemp.empno = empno;
        get myemp forUpdate;
        if(myemp is norecordfound)
            nfresp HttpResponse;
            nfresp.status = 404;
            nfresp.body = "Employee " + empno + " Not Found";
            serviceLib.setRestResponse(nfresp);
        else
            delete myemp noCursor;
        end
    end
  end
Each of the @Rest annotations has three properties
uriTemplate
This property allows the user to parameterize the URI. Each parameter in the URI corresponds to a parameter defined in the function. At run time, the values of the parameters are substituted into the URI, which is then appended to the base URI to create the full URI needed to invoke the service.
requestFormat
- NONE – the request data is sent as a string
- XML – the request data is an EGL record, which is converted at run time to XML
- JSON – the request data is an EGL record, which is converted at run time to JSON
- NONE – the response data is a raw string that is sent to the EGL client as-is
- XML – the response data is an XML formatted string that is to be converted to an EGL record
- JSON – the response data is a JSON formatted string that is to be converted to an EGL record
Enhancements to Spring REST Project Creation
This update introduces changes to the project creation flow due to a last-minute modification in the library shipping logic.
Earlier, Spring Boot–related libraries were shipped as a ZIP file at the following location: IBMIMShared\plugins\com.ibm.etools.egl.rui.deploy.j2ee_1.0.1.v20250318_1058\lib\
Users had to manually add these libraries to the project's build path.
With the new changes, this manual step is no longer required. All required libraries are now added automatically during project creation, build, and deployment.
Project Creation Flow
There are two ways to create a Spring REST–enabled project:
- Using the Web Project flow
- Using the General Project flow
- Creating a Spring REST Project Using the Web Project Flow.
Below are the steps to create a new Spring REST project when a Web project is selected.
- Create a new EGL Web Project.
- Select None for the Target Runtime Environment.
- Select Show advanced settings.
- Enable Support Spring REST under EGL project features.
- Click Finish to create the project.
- Creating a Spring REST Project Using the General Project Flow
Below are the steps to create a new Spring REST project when the General project is selected.
- Create a new EGL General Project.
- Select Java for the Target Runtime Environment.
- Select Show advanced settings.
- Enable Support Spring REST under EGL project features.
- Click Finish to create the project.
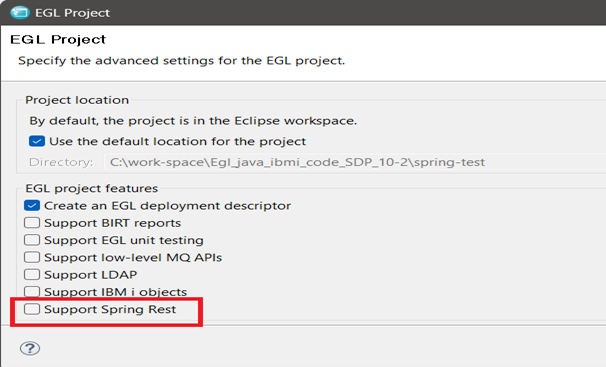
- Java - When Java is selected and Show advanced settings is
enabled, the option Support Spring REST under EGL project features
is available on the next page, as shown below.
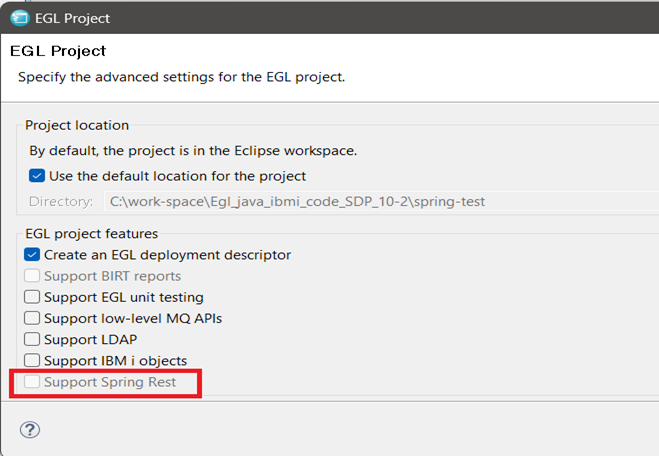
- COBOL - When COBOL is selected and Show advanced settings is
enabled, the option Support Spring REST under EGL project features
is not available on the next page, as shown below.
When creating a new service, only one option, which is Create as web (REST) service, will be available.
After building and deploying the project, you will see all the libraries are automatically added to the project.
Documenting the REST Service
EGL provides additional annotations for documenting REST Services. This is used for generating the OpenAPI document that defines the REST Service.
This includes:
TitleThis is the title of the OpenAPI document
Description
A brief description of the service, operation or record
Version
A user-defined version number of the service
Tags
Allows the service operations to be grouped by keyword(s) in the OpenAPI document.
Refer to Figure 1 for example.
Preferences For Documenting the REST Service
Default values for OpenAPI documentation generation are provided in the EGL Services preferences page.
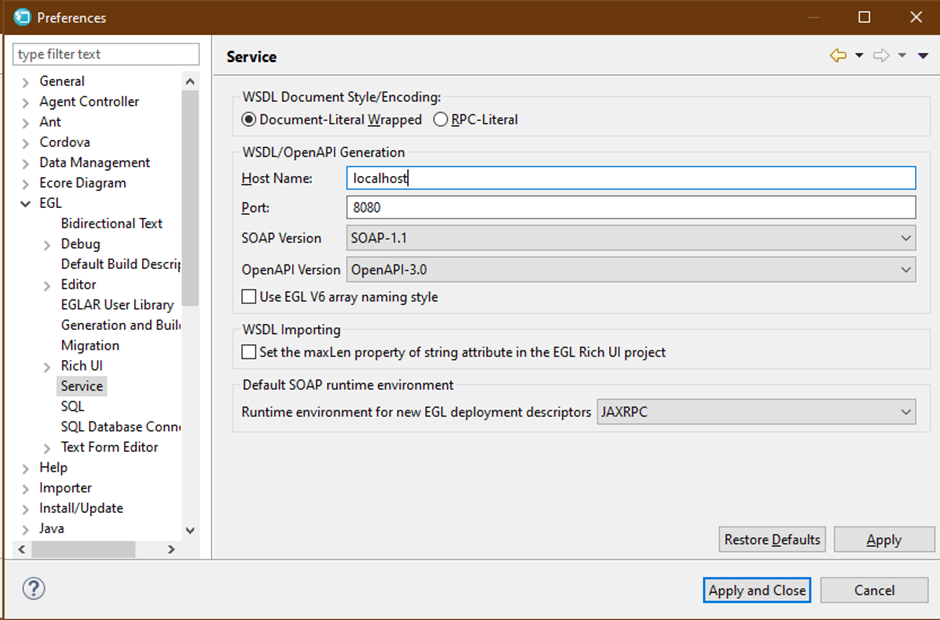
Host Name and Port are used to customize the server URL listed in the OpenAPI document. Note that port 8080 should be specified here for Spring deployment as this is the default port used by Spring.
OpenAPI Version controls the format of the generated OpenAPI document. Default is OpenAPI-3.0, but you can also select OpenAPI-2.0 (also known as Swagger specification).
Specifying Service Deployment In The Deployment Descriptor
- Open the EGL Deployment Descriptor for your project.
- Go to the Service Deployment tab and click Add.
- Select Generate as: REST Service and add the EGL Service you wish to deploy as a REST service and click ‘Finish’.
- If desired, set the URI under REST Web Service Properties. This is the baseURI
that the service will be available at. The default value is the service name. The
uriTemplate is appended to this to create the invocable URI e.g. http://localhost:8080/service1/employee/{empno}
Figure 3. Adding a REST service deployment 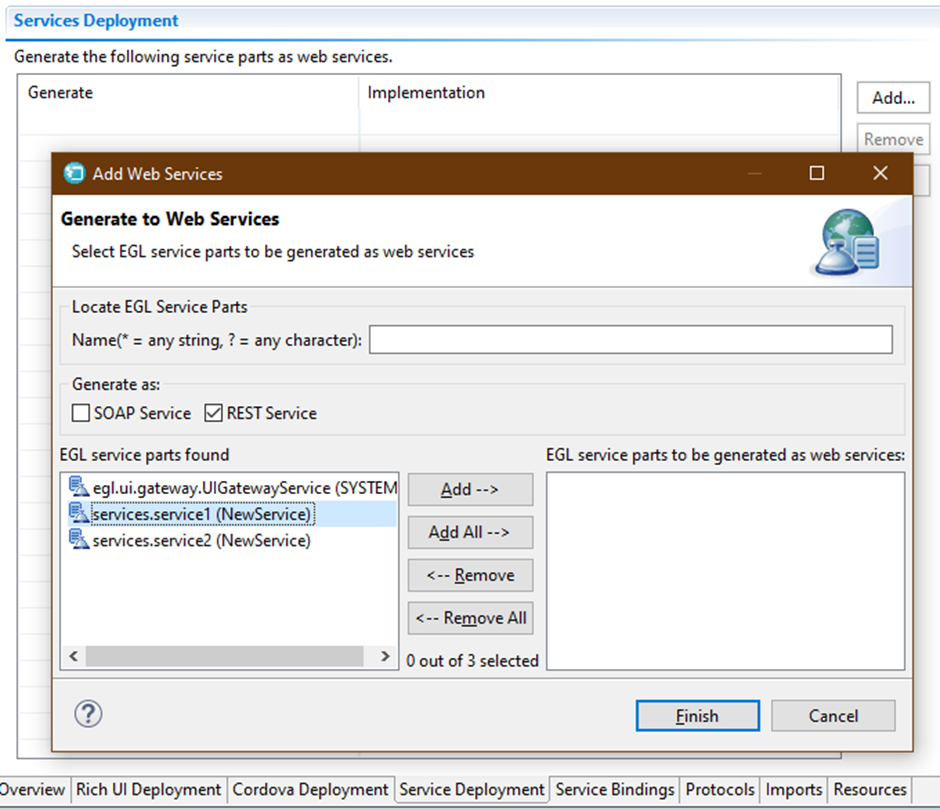
Figure 4. Rest service deployment 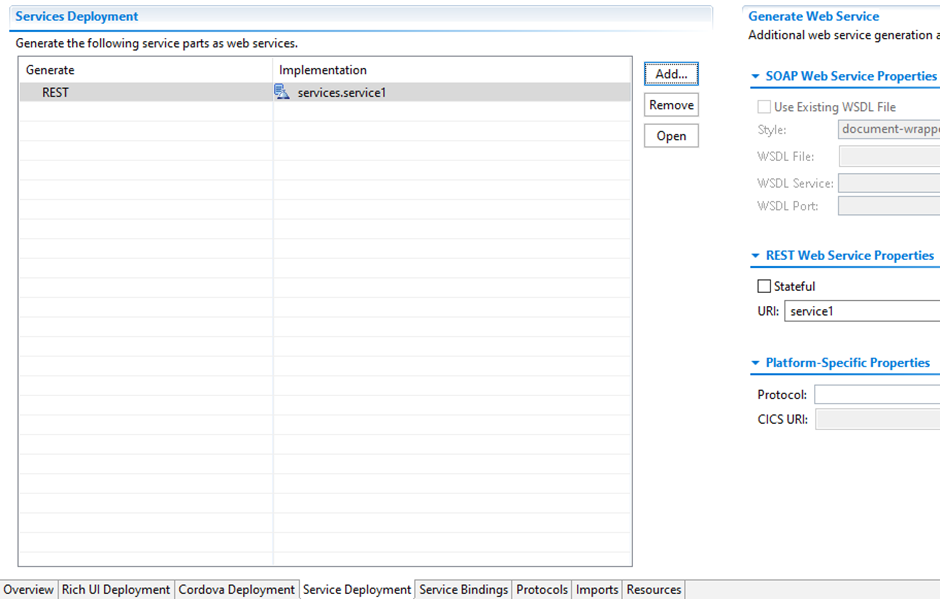
Deploying EGL REST Services With Spring
To deploy the EGL Service as a Spring REST service, you must specify the deployment target as a Java project.
- Open the build descriptor for your project, and set the property genProject to a Java project (or EGL General project).
- Open the EGL Deployment Descriptor for your project.
- Go to the Overview tab, and set the Deployment Target to be the build descriptor from step 1.
- Right click on the deployment descriptor, and select Deploy EGL Descriptor.
- Add the Spring libraries to the Java build path for the target genProject. These
libraries are provided for you in the directory:
RBD_SHARED_DIR/plugins/com.ibm.etools.egl.rui.deploy.j2ee\lib\eglspring_lib.zipFigure
5: Deployemnt target for Spring REST deployment.
Figure 5. Deployemnt target for Spring REST deployment 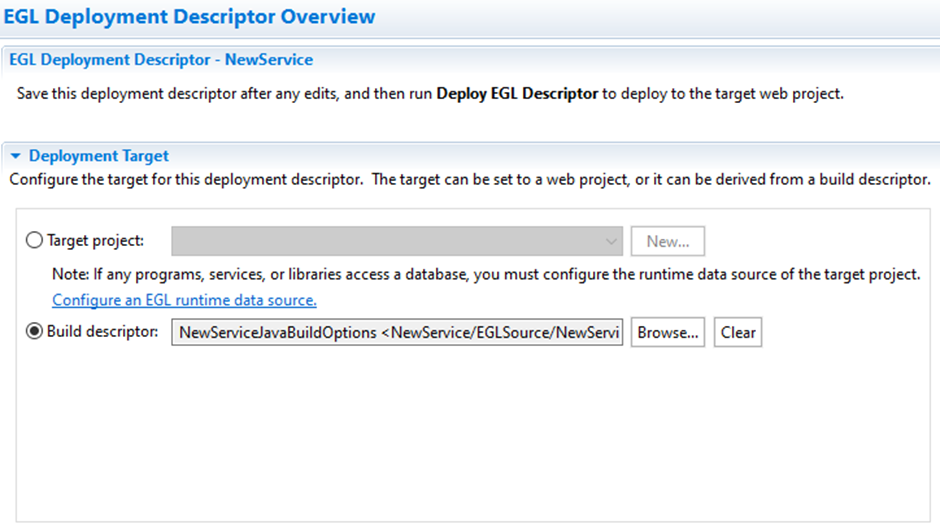
The generated Java for the EGL Service will be deployed to the target genProject, along with wrapper artifacts that will allow you to run the EGL Service as a Spring REST application (See Figure 6).
Running EGL REST Services With Spring
To start the EGL REST Service, run the program EGLSpringApplication in the eglrest package (See Figure 6 ). Spring Boot will start its embedded Tomcat server with a default port of 8080. This application can be exported as a runnable jar file, for standalone deployments on local machines or Docker.

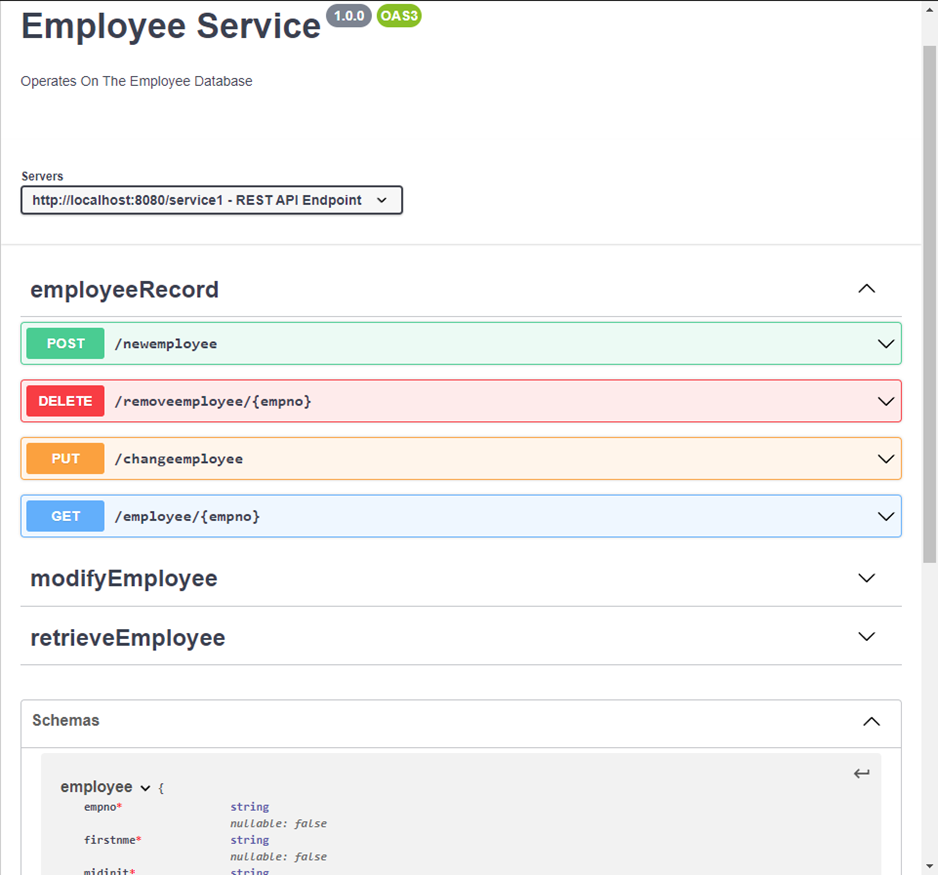
Invoking The EGL Service
The URL and other information needed to invoke the service is provided in the generated OpenAPI document (refer to service1.json in Figure 6). An example with Swagger Editor is shown in figure 6. Note that the documentation annotations shown in Figure 1 are used to format this presentation. For example, all the operations tagged with ‘employeeRecord’ are grouped together.
The invocation URL is provided by the Servers block (REST API Endpoint), and the paths for each operation are appended to this (refer to Figure 7).
Customizing The Service Response
The system function serviceLib.setRestResponse allows an EGL Java REST Service to set a custom HTTP response depending on the business logic. Otherwise, the default response is 200 OK (along with the service function’s return data) or 500 Internal Server Error (for unhandled exceptions). Refer to Figure 1 for an example of this function.
serviceLib.setRestResponse(response HttpResponse in)body, type STRING?
- body contains the value in one of three formats (XML, JSON, or NONE), as
described in “REST for the
developer.”
- If body is not specified, then the value of body will be the function response in one of three formats (XML, JSON, or NONE)
headers contains a set of name-value pairs. Each entry key in the dictionary is the name of an HTTP header that is to be returned from the service, and the related value (a string) is the value of that header.
status, type INTstatus contains the HTTP status code for the response. If status is not specified, then the value 200 is used.Important status codes include 200 (OK) and 404 (Not Found). For a complete list, go to the website of the World Wide Web Consortium (http://www.w3.org/) and search for "HTTP status code.".
statusMessage, type STRING
statusMessage contains the HTTP status message for the response. If statusMessage is not specified, then the value OK is used.
Important status messages include OK (code 200) and Not Found (code 404). For a complete list, go to the website of the World Wide Web Consortium (http://www.w3.org/) and search for "HTTP status code."
Migration from Older Version to V10
Below are the steps to migrate a Spring EGL project from RBD 9.7.2 to IBD 10.
Steps to Export from RBD 9.7.2
- Right-click the EGL Spring project that needs to be migrated.
- Select Export.
- Two options are displayed: WAR file and Export.
- Select Export.
- On the next page, several export options are displayed.
- Under the General category, select File System, and then click Next.
- On the next page:
- Ensure the correct project is selected.
- Make sure all dotfiles for the project are selected.
- In the To directory field, specify the export directory location.
- Click Finish to complete the export process.
Steps to Import into IBD 10
- Go to File and select Import…
- Under the General category, select Existing Projects into Workspace.
- Click Next.
- On the next page, select the root directory where the exported project is stored.
- Click Finish.
- A Migration window appears. Follow the prompts by clicking Next, and then click Finish.
- Select the imported project and right-click it.
- Click Properties.
- In the Properties window:
- Select EGL Project Features.
- Enable Support Spring REST.
- Click Apply and Close.
- Open the build descriptor file.
- Modify the genProject name to a new or unique value, and save the file.
- Generate and deploy the project.