Configuring a Model in Ollama
Model name in the Ollama can be configured in two ways
- Local System (Ollama)
- Centralized Ollama
Prerequisites
- Install the latest version of IBM Business Developer (IBD) V10.
- Install the latest version of Ollama.
- Download the required build file (from Passport Advantage).
Configuring a Model on the Local System (Ollama)
- Ensure that Ollama is installed and running in the background. Note:To verify, check the system taskbar notification area.

- Download the build file from Passport Advantage.
- Place both the build file and the model file in the same directory.
Example: IBD_V10\bin

- Open a command prompt in the folder where the files are located.
- Run the following command and ensure that the command runs successfully.
ollama create GraniteModel1 -f Modelfile Note:You can replace GraniteModel1 with any model name of your choice.
 - Run the following command and confirm that the newly created model appears in the list.
ollama list
- Copy the model name and open IBD.
- Go to Preferences➔API Keys.
- Paste the model name in the Ollama Model name field.

- Click Apply, then Apply and Close.
- Run the eglcopilot.exe application and when prompted, allow access for domain
networks.

- Verify that the server starts successfully.Note:Do not close the eglcopilot.exe application, it must run in the background.

- In IBD, navigate to: Windows➔Show View➔Others.
- Select EGL Code Accelerator and click Open.

- EGL Code Accelerator opens successfully.
- Select the Local Granite model and start interacting with the EGL Code
Accelerator.
 Note:Chat history is stored in the location: C:\Users\<username>\EGL Code Accelerator\IBD_chats.
Note:
If you encounter issues accessing EGL Code Accelerator:
-
Close the EGL Code Accelerator tab in the IBD.
-
Repeat steps 13 through 16.
Configuring the Model Hosted in Centralized Ollama
Follow the steps below to configure a model hosted on a centralized Ollama server.
- Navigate to the API Keys tab in the Preferences window.
- In the Ollama URL and Ollama Model Name fields, enter the centralized
ollama url and ollama model name as shown in the image.
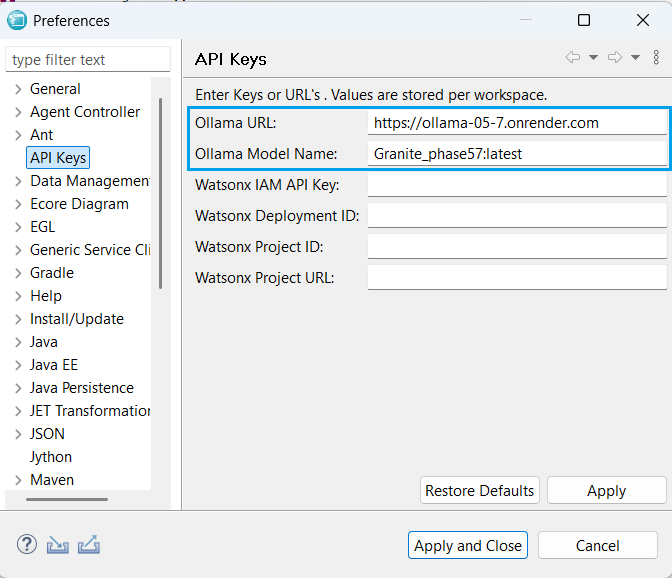
- Click Apply and Close.
- The model is now successfully configured in the centralized ollama.