Working with HATS rich client projects
As with a HATS Web project, when you create a new HATS rich client project, a set of folders is created to help you organize your HATS files. An example of a default project is shown below. The highest level folder has the same name as the name you give to your project when you create it. In that folder are other high-level folders that contain objects defined in your HATS project. Some folders do not appear until you create certain objects.
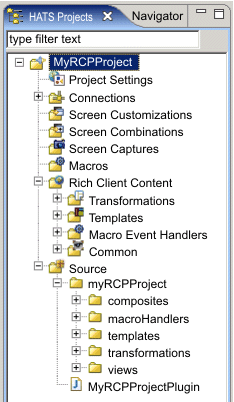
- A rich client project displays a Rich Client Content folder, where a Web project displays a Web Content folder.
- The Rich Client Content folder is displayed at the root level of the rich client project. However, there is no actual Rich Client Content folder in the project. One is dynamically displayed only to create consistency with the Web Content folder displayed for Web projects.
- Some of the folders displayed under the dynamically displayed Rich Client Content folder are also displayed under the Source folder.
- Label decorators for the dynamically displayed rich client folders may not decorate properly since the folders do not map to physical folders in the project.
You can create subfolders within these high-level folders to help organize your project. For instance, as you create screen captures for your project, you might want to create folders under the Screen Captures folder to organize and group the captured screens. To create a folder, right-click on one of the high-level folders in the tree and click New HATS > Folder. To move a file into a different folder, right-click on the file and select Move, or you can use the drag-and-drop method.
HATS projects can be shared in a team environment by going to the Navigator View of the HATS perspective.
Right-click the project and select Team
> Share Project. Select the repository type from the list and
click Next. Rational® SDP supports several
repositories. For more information, refer to the Rational® SDP documentation
and search on repository.
resourceUpdate.sts file. This
file is automatically generated when testing a project within the
toolkit. The file should not be under version control and can safely
be ignored or deleted before placing a HATS project under version
control.
To exclude the file from version control, open Window -> Preferences -> Team -> Ignored Resources and
click Add Pattern to add a new pattern.
Enter resourceUpdate.sts and click OK.
Make sure the new pattern is selected in the list of ignored patterns,
and click OK to save the settings.