Creating a project
Before you begin
- You must have closed Rational® Test Control Panel sessions that are running if any.
- If Rational® Integration Tester is running and you have just completed the tasks in Creating and running a test, you probably have that project open. To create and run a stub with a WSDL file, you must create a new project. Therefore, you must close the existing project by clicking . This action closes the project and restarts Rational® Integration Tester.
About this task
After you restart Rational® Integration Tester, you must create a new project, provide a name for your project and save it on your local drive. The following instructions are applicable for the Windows™ OS.
Procedure
- In the startup window, select Create Project and click OK.
- Enter a name for the project in the Project Name field.
-
Click Browse and select a location to save the project.
If you do not browse and select a location, the project is saved in the default location, which is your home directory. For example, the default location is C:\Users\USER_ADMIN as shown in the following image.
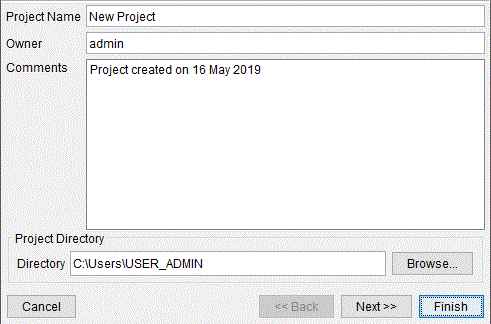
- Click Finish.
Results
What to do next
You must start the Add Numbers server and client. See Starting Add Numbers server and client.
Starting Add Numbers server and client
Before you begin
You must have created a project as described in Creating a project. Your project must be open in Rational® Integration Tester.
About this task
Rational® Integration Tester contains some example APIs. In this example, you use AddNumbers, which has a WSDL document describing the API.
If you want to model a system that does not have a WSDL definition, you can use a Swagger file (that you completed in Creating and running a test) or you can discover and record an API (that you can complete as described in Discovering, Recording, and Intercepting an HTTP proxy).
Procedure
- In the local drive, go to install_location/RationalIntegrationTester/examples/addnumbers.
-
Run the startup script.
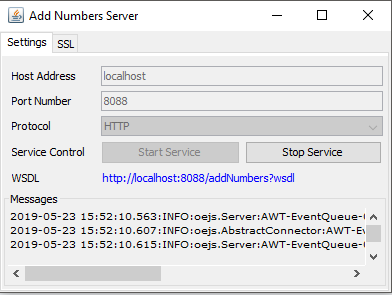
The Add Numbers Server window is displayed.
-
Click Start Service.
This action starts the Add Numbers web service on the host.
Make a note of the Host Address and Port Number fields. You need them in the next steps.
- In the local drive, go to install_location/RationalIntegrationTester/examples/addnumbersclient.
-
Run the startup script.
Note: Ensure that the host and port fields match the values that you noted earlier from the Add Numbers Server window.
-
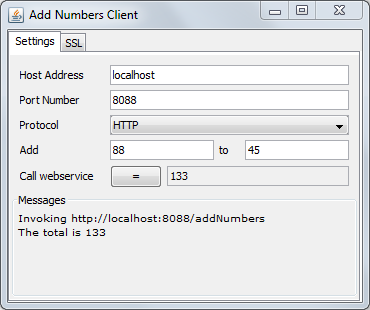
Click the equal sign.
The client application sends an HTTP SOAP request to the server application, which adds the two numbers and returns the result. You can see the result on the Add Numbers Client window. This is a simple, easy-to-understand API to get you started with creating a stub.
Results
You have successfully tested a web service hosted on your local system by using the sample WSDL.
What to do next
Importing the Add Numbers server’s WSDL file to model its API
Before you begin
You must have completed testing of the web service by using the sample WSDL file.
Procedure
-
Return to the Add Numbers Server window. Select the WSDL URL displayed in
the WSDL field (
http://localhost:8088/addNumbers?wsdl) and press Ctrl+C to copy it. - Return to the Rational® Integration Tester window. In the toolbar, click Architecture School, and then click Logical View to view the canvas on which you will model the system.
-
Paste the URL onto the canvas by clicking . Alternatively, in the Synchronization Source window, click
New. In the Select Location dialog, paste the URL
into the Location field and click OK.

- Click Next.
Results
Rational® Integration Tester creates service components and operations on the canvas to represent the service described in the WSDL file. The options for creating tests and stubs from the service definition are also displayed. You have already used these options to create and run a test in Creating and running a test.
What to do next
You must create a stub from the WSDL definition. See Creating a stub from the WSDL definition of the API.
Creating a stub from the WSDL definition of the API
Before you begin
You must have completed importing the WSDL in Rational® Integration Tester.
Procedure
-
In the Generate Assets for Operations page of the Create a new
Synchronization Source window, select the additionStub check box
in the Create Stubs column.
This action creates a stub for the operation based on the interface defined in the WSDL file.

-
Click Next.
The Summary page shows the number of items created.
-
Click Finish.
The stub is opened in the Test Factory perspective, which is used for creating and editing tests and stubs.
By default, the Events tab in the Stub editor is opened, which shows the events that the stub can handle. In this case, there is only one event for the addition operation. There are two sub-tabs under the Events tab labeled Input and Activity. When an event is selected, the Input tab displays the message that is expected to be received by the stub and that is handled by the selected event.

The stub has the message structure for the SOAP message that the addNumbers addition operation expects as input. In the Activity tab, you can configure the response that is sent or other actions that are taken, when the stub receives a request that matches the data in the Input tab. Both the Activity tab and the Input tab contain the document structure, but no data yet.
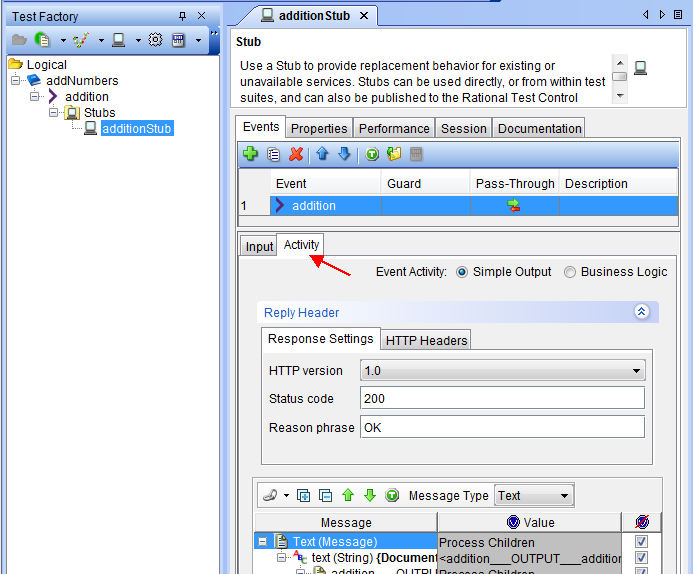
On the Activity tab, the last two nodes in the tree called are called return (Element) (an XML element called
return) and (Text) (the text content of that element). -
Adjacent to the (Text) node, double-click the blank cell in the
Value column of the table. Enter the number 100 and press
Enter. This is to check whether it is the stub that is returning the result
in absence of the Add Numbers server.

- Save the stub.
Results
You have successfully created a stub from the WSDL definition for the API.
What to do next
You must run the stub created. See Running the stub.
Running the stub
Before you begin
Procedure
-
In the toolbar, click Run or press F5.
This action runs the stub in the Test Lab perspective.
- Return to the Add Numbers Client window.
-
Click the equal sign.
The result is the same response as earlier, that is 133 because the client was not configured to use the stub yet.
Results
You have successfully run the created stub.
What to do next
You must configure the client to use the created stub. See Configuring the Add Numbers client to use the stub (virtual service).
Configuring the Add Numbers client to use the stub (virtual service)
Before you begin
You must have completed creating the stub and run it.
About this task
To support Rational® Integration Tester Service Virtualization, you must configure HTTP clients to use the Rational® Integration Tester HTTP/TCP Proxy. Details about the use of this proxy are in Discovering, Recording, and Intercepting an HTTP proxy.
You configure the Add Numbers client to use the Rational® Integration Tester proxy by using the standard Java proxy settings.
Procedure
- Close the Add Numbers Client window.
- Open the startup script located at install_location/RationalIntegrationTester/examples/addnumbersclient in a text editor.
-
Edit the script as follows:
- In Windows:
- Comment out the line
%JAVA_HOME%\bin\java %NET_PROPS% %SSL_PROPS% -jar
AddNumbersClient.jar
by inserting @rem at the beginning.The edited entry appears as:
@rem %JAVA_HOME%\bin\java %NET_PROPS% %SSL_PROPS% -jar
AddNumbersClient.jar
. - Uncomment the line for connecting to a proxy as indicated by the other comments in the file.
Ensure that this line includes the
–Dhttp.proxyHost=localhostand-Dhttp.proxyPort=3128arguments, which direct the application to use the proxy that is started by Rational® Integration Tester, the one that is running locally on port 3128.
- Comment out the line
- In Linux:
- Comment out the line
$_RUNJAVA" "${SSL[@]}" -jar
"$_SCRIPTDIR/AddNumbersClient.jar
. - Uncomment the line for connecting to a proxy, as indicated by the other comments in the file.
Ensure that this line includes the arguments
-Dhttp.proxyHost=localhostand-Dhttp.proxyPort=3128, which direct the application to use the proxy that was started by Rational® Integration Tester, the one that is running locally on port 3128.
- Comment out the line
- In Windows:
- Save and close the file.
Results
You have successfully configured the Add Numbers client to use the stub.
What to do next
You must call the stub. See Calling the stub.
Calling the stub
Before you begin
You must have completed configuring the Add Numbers client to use the stub.
Procedure
-
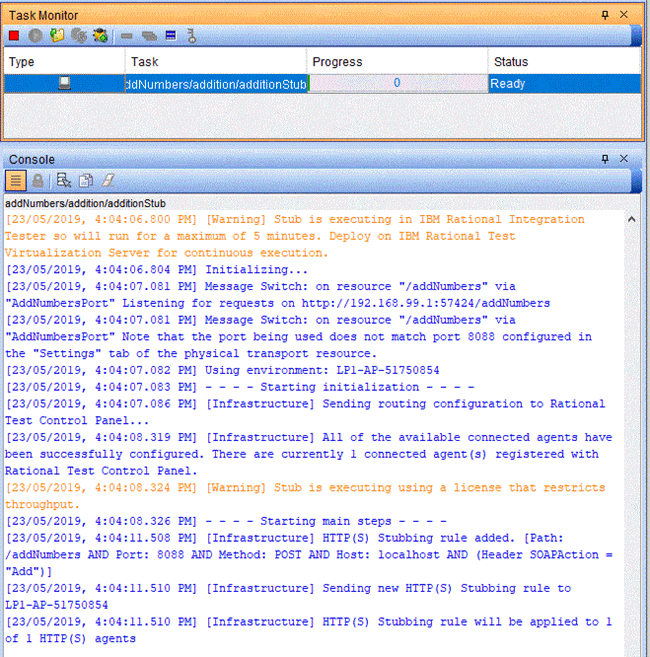
Open the Test Lab view and verify that the stub is still running.
The status of the stub shown in the Task Monitor must read Ready. If it reads Cancelled, run the stub again.
-
Open the Add Numbers client by running the startup script located at install_location/RationalIntegrationTester/examples/addnumbersclient.

-
Click the equal sign.
The client returns 100 instead of the correct answer because this is the number that you configured in the stub when you created it in Creating a stub from the WSDL definition of the API.
Instead of calling the Add Numbers server, the request got the response from the stub, which gives you complete control over the responses that the client receives to its requests, for example, while testing error cases.Important: In Rational® Integration Tester, stubs stop running after a specific duration. If the result returned by the Add Numbers client is 133, that is, the actual value returned by the Add Numbers server, return to Rational® Integration Tester and ensure that the stub is still running. For tests that need continuously-running stubs, you must deploy and run them in Rational® Test Virtualization Server. - Optional:
To make the Add Numbers client receive its response from the Add Numbers server again, complete
the following steps:
What to do next
- To model your system when you do not have Swagger definition or WSDL files and for more details about the HTTP/TCP Proxy, see Discovering, Recording, and Intercepting an HTTP proxy.
- For an alternative procedure for creating a stub for the Add Numbers API, click the tile labeled Create a virtualized Web Service on the Rational® Integration Tester Home screen. This opens an internal interactive guide that walks you through creating a stub for the Add Numbers server.
- To create additional stubs for the addition operation, perform the following steps:
- Open the Test Factory perspective in Rational® Integration Tester.
- In the tree on the left, right-click the addition operation and click . This action creates a stub for the operation and an event using Message Exchange Pattern of the operation that was imported from the WSDL file.
- To create stubs from data from your real systems rather than entering data manually, you can record the traffic in the system under test and create stubs from those recordings. For instructions on how to record traffic for creating stubs, see Discovering, Recording, and Intercepting an HTTP proxy. You can also use the recording in combination with a WSDL or Swagger definition to model the system under test. In other words, create the service components, transport resources, and operations by synchronizing with WSDL or Swagger and then record the traffic to create tests and stubs.