Git operations in Rational® Integration Tester
You can work with your project files that are in a Git repository from Rational® Integration Tester and perform Git operations such as checking out files from the remote repository and committing changes in the local repository to the remote repository. You can also set up the preferences in Rational® Integration Tester for Git.
- Checking the status of files in repositories
- Updating a project in the repository
- Delivering changes to the project in the Git repository
- Undoing changes in the local repository
- Setting preferences for Git
Checking the status of files in repositories
You can visually ascertain the connectivity between Rational® Integration Tester and your project in a Git repository and check the status of the files in that project on the repositories.
Before you begin
- You must have set up the Git repositories.
- The project files must exist in the local repository.
Procedure
- Open your project after you start Rational® Integration Tester, and then click Browse to navigate to the project in the local repository.
-
Look at the status bar for the icons that indicate connectivity to the Git repository.
Use the following table to interpret the icons displayed.
Icon
Description

No Git repository exists that contains the project opened in Rational® Integration Tester. The project files exist only in the local repository.

The Git repository exists but is not connected.

The Git repository exists and is connected.
-
Check for the status of the files in the project contained in the local and remote Git
repositories from the Status bar.
Use the following table to interpret the status displayed.
Icon
Description

The master branch in the Git repository exists but is not connected.

The master branch in the Git repository exists and is connected.

The master branch in the Git repository exists and is connected. The status of the files in the repositories is shown with numbers prefixed with colored arrows.
The green colored arrow (
 ) indicates the local repository and the red colored arrow (
 ) indicates the remote Git repository. Both the green and red arrows together (
 ) indicate a file conflict state between the files in the local and files in the remote
repositories.
) indicate a file conflict state between the files in the local and files in the remote
repositories.
The number along with the green colored arrow indicates the files on the local repository that are modified with respect to the same files on the remote Git repository.

The number along with the red colored arrow indicates the files on the remote Git repository that are modified with respect to the same files on the local repository.

The number along with both the green and red colored arrows indicates the files with a potential conflict.
A conflict is displayed when the same file has changes made by you in the local repository and has also been changed by someone else on the remote repository. You must resolve this conflict by either merging the changes or rejecting the changes in the remote version. You must resolve this conflict outside of Rational® Integration Tester by using the Git commands or any other method you prefer.
-
Hover your cursor over the Git icon and numbers to view the location of the Git repository
connected to
Rational® Integration
Tester displayed
as a tooltip:

-
Click the area with the Git icon and numbers, to view the details of the files in the
repositories and files that are in conflict.
The Git Information window is displayed as shown in the following sample image.
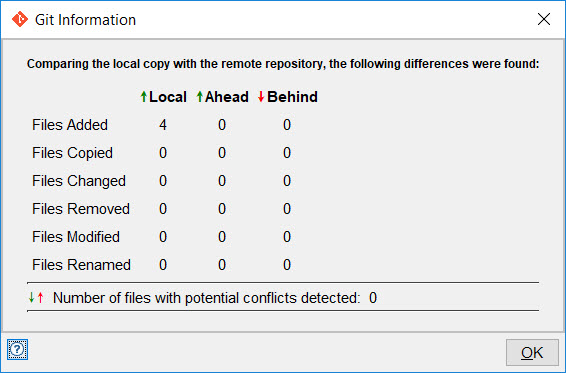
The details of the files in the local repository that are modified with respect to the files in the remote repository are shown in the following table.
Status
Description
Local
The details of the files in the local repository.
Ahead
The details of the files in the local repository that are modified with respect to their version on the remote Git repository. The files in the local repository have changes that are not committed or pushed to the remote repository.
Behind
The details of the files in the remote Git repository that are modified with respect to their version on the local Git repository. The files in the remote repository have changes that are not yet pulled into the local repository.
-
Check for the status of the files in the project contained in the local and remote Git
repositories by looking at the icons prefixed to the test asset in the Test
Factory or Architecture School perspective views.
Use the following table to interpret the displayed icon prefixed to the test asset.
Icon
Description

The file in the local repository that is changed from the file in the remote Git repository.
For example, the icon displayed for a changed file in the Test Factory perspective is
 .
.
The file in the remote Git repository that is changed from the file in the local repository.
For example, the icon displayed for a changed file in the Test Factory perspective is
 .
.
The file is in conflict means that the file has changes made by you in the local repository and the same file has also been changed by someone else on the remote repository.
For example, the icon displayed for a changed file in the Test Factory perspective is
 .
.
Updating a project in the repository
You can check out the project files from the remote Git repository to your local repository by using the UI option in Rational® Integration Tester. You can use this option when you want to use the latest version of the project files from the remote Git repository. This option performs a Git checkout of those files that have a conflict and does a Git fetch for the other files.
Before you begin
- You must have set up the Git repositories.
- The project files must exist in the local repository.
- You must have opened the project from the local repository.
Procedure
-
From the Menu, click .
The Update Project window is displayed.
-
Select your action from the following options:
If... Then... Result There are no new commits to the remote repository. Click OK. No files are updated in the local repository from the remote repository. There are changed or new files committed to the remote repository. Click OK. The files are updated in the local repository with the files from the remote repository. Note: The open editors in your project are refreshed and reflect the updated files in the local repository.There are files in a conflict state between the local and remote repositories. Click OK. The files in the local repository that are in the conflict state are overwritten by the files from the remote repository. Notes:- The uncommitted changes in your project files are discarded.
- The open editors in your project are refreshed and reflect the updated files in the local repository.
Perform the following steps if you want to retain the changes in your local version of the file and merge the changes from the remote file version:- Click Cancel to close the Update Project window.
- Perform the merge operation outside of Rational® Integration Tester by using your preferred Git method.
After you merge the files, both the local and the remote repositories contain the same version of the files.
Results
- Updated the project files in your local repository with the version from the remote Git repository.
- Retained your changes in the files by resolving the merge conflict state by using your preferred Git method.
Delivering changes to the project in the Git repository
After you have made changes to the project files, you can deliver the changes in your local Git repository by using the UI option in Rational® Integration Tester to the project in the remote Git repository. This option performs the Git add, Git commit, and Git push operations on the files in that project to the remote Git repository.
Before you begin
- Set up the Git repositories.
- Ensured that the project files exist in the local repository.
- Opened the project from the local repository.
- Made changes in the project for the files to show as changed in the Rational® Integration Tester UI.
About this task
- If no new files are shown as present in the remote repository, you can continue with working on your project.
- If new files are shown as present in the remote repository, then you must perform the Update Project action to fetch the latest files from the remote repository.
After you complete making changes to your project files and you want to commit your files to the remote repository, you can use the Deliver changes option.
| If... | Then... | Result... |
|---|---|---|
|
You want to merge the changes in the files. |
You must perform the merge operation outside of Rational® Integration Tester by using your preferred Git method. |
Files in the local and remote repositories are merged. The changes that you made in your project files are retained in the merged files. |
|
You want to use the files in the remote repository and discard the changes you made in your project files. |
Perform the following actions:
|
The changes in your project files are discarded and files in the local repository are updated with the files from the remote repository. After you deliver the changes, files in the remote repository are updated and both repositories have the same files. |
Procedure
-
To use the Menu option, complete the following steps:
-
From the Menu, click .
The changed files are listed as selected in the Deliver changes dialog box.Note: Using the Menu option to deliver changes selects all the resources that have changed in the project. You can clear the selected resources by using the Clear All
 icon or by selecting the check box of the resource
that you want to clear. You can select the resources that
you want by selecting the check box or use the
Select All
icon or by selecting the check box of the resource
that you want to clear. You can select the resources that
you want by selecting the check box or use the
Select All
 icon to select all the resources
listed.
icon to select all the resources
listed.
-
From the Menu, click .
-
To use the Git options in the Logical View (Tree View) of the
Architecture School perspective, complete the following steps:
-
Select the test asset that contains the changed file, right-click,
and then click Deliver changes.
You can identify the changed file if it is prefixed with the
 icon.
icon. The changed files are listed as selected in the Deliver changes dialog.Note: Using the Git menu option to deliver changes selects all the resources under that test asset that you selected. You can clear the selected resources by using the Clear All icon or by selecting the check box of the resource
that you want to clear. You can select the resources that
you want by selecting the check box or use the
Select All
icon to select all the resources
listed.
The changed files are listed as selected in the Deliver changes dialog.Note: Using the Git menu option to deliver changes selects all the resources under that test asset that you selected. You can clear the selected resources by using the Clear All icon or by selecting the check box of the resource
that you want to clear. You can select the resources that
you want by selecting the check box or use the
Select All
icon to select all the resources
listed.
-
Select the test asset that contains the changed file, right-click,
and then click Deliver changes.
-
To use the Git options in the Test Factory perspective, complete the
following steps:
-
Select the test asset that contains the changed file, right-click,
and then click Deliver changes.
You can identify the changed file if it is prefixed with the
 icon.
icon.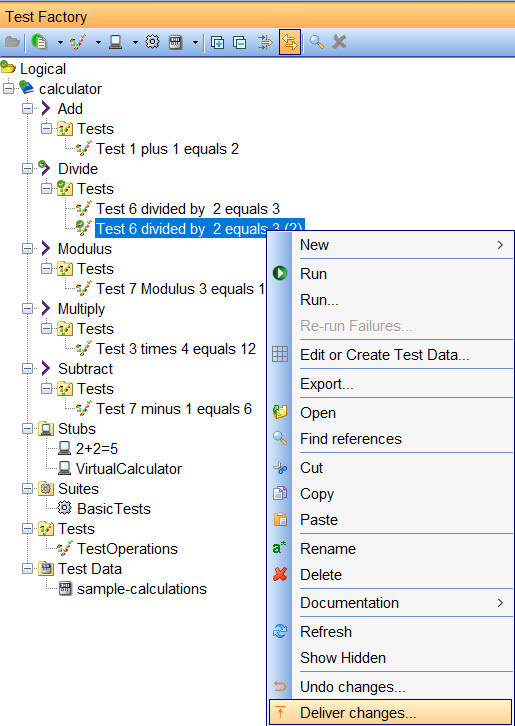 The changed files are listed as selected in the Deliver changes dialog.Note: Using the Git menu option to deliver changes selects all the resources under that test asset that you selected. You can clear the selected resources by using the Clear All icon or by selecting the check box of the resource
that you want to clear. You can select the resources that
you want by selecting the check box or use the
Select All
icon to select all the resources
listed.
The changed files are listed as selected in the Deliver changes dialog.Note: Using the Git menu option to deliver changes selects all the resources under that test asset that you selected. You can clear the selected resources by using the Clear All icon or by selecting the check box of the resource
that you want to clear. You can select the resources that
you want by selecting the check box or use the
Select All
icon to select all the resources
listed.
-
Select the test asset that contains the changed file, right-click,
and then click Deliver changes.
-
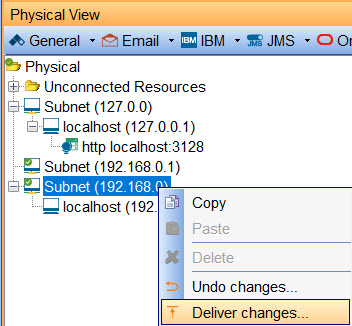
To use the Git options in the Physical View of the
Architecture School perspective, complete the following steps:
-
Open the Physical View, select the test
asset, right-click, and then click Deliver
changes.
You can identify the changed file if it is prefixed with the icon.
 The changed files are listed as selected in the Deliver changes dialog.Note: Using the Git menu option to deliver changes selects all the resources under that test asset that you selected. You can clear the selected resources by using the Clear All icon or by selecting the check box of the resource
that you want to clear. You can select the resources that
you want by selecting the check box or use the
Select All
icon to select all the resources
listed.
The changed files are listed as selected in the Deliver changes dialog.Note: Using the Git menu option to deliver changes selects all the resources under that test asset that you selected. You can clear the selected resources by using the Clear All icon or by selecting the check box of the resource
that you want to clear. You can select the resources that
you want by selecting the check box or use the
Select All
icon to select all the resources
listed.
-
Open the Physical View, select the test
asset, right-click, and then click Deliver
changes.
Results
The changes that you made in your project files in Rational® Integration Tester are pushed to the project in the remote Git repository.
Undoing changes in the local repository
You can check out the project files from the remote Git repository to your local repository by using the UI options in Rational® Integration Tester. Use this option when you have uncommitted changes in the project files on your local Git repository and you want to ignore those and reload the project using files from the remote Git repository.
Before you begin
- Set up the Git repositories.
- Ensured that the project files exist in the local repository.
- Opened the project from the local repository.
- Made changes in the project for the files to show as changed in the Rational® Integration Tester UI.
About this task
You can undo changes in your project files in the local repository by checking out the files from the remote Git repository. When you perform the Undo changes action in your project, the open editors in your project are refreshed and the files in the local repository are updated. All files that you had changed are discarded and are replaced with the files from the remote repository.
Procedure
-
To use the Menu option, complete the following steps:
-
From the Menu, click .
The changed files in the local repository are listed as selected in the Undo changes window.Note: Using the Menu option to undo changes selects all the resources that have changed in the project. You can clear the selected resources by using the Clear All icon or by selecting the check box of the resource
that you want to clear. You can select the resources that
you want by selecting the check box or use the
Select All
icon to select all the resources
listed.
-
From the Menu, click .
-
To use the Git options in the Logical View (tree view) of the
Architecture School perspective, complete the following steps:
-
In the tree view, identify the files that are changed and uncommitted files in the project,
which are prefixed with the icon.
For example, if you have created a copy of a test and have not yet checked in the project files into the remote Git repository, the changed asset is displayed with the prefixed icon.
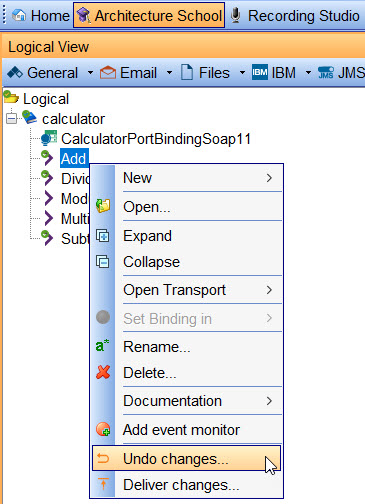
-
Select the test asset that contains the changed file, right-click,
and then click Undo changes.
The changed files are listed as selected in the Undo changes window.Note: Using the Git menu option to undo changes selects only the resources under that test asset that you selected. You can clear the selected resources by using the Clear All icon or by selecting the check box of the resource
that you want to clear. You can select the resources that
you want by selecting the check box or use the
Select All
icon to select all the resources
listed.
-
In the tree view, identify the files that are changed and uncommitted files in the project,
which are prefixed with the
-
To use the Git options in the Test Factory perspective, complete the
following steps:
-
In the Test Factory perspective, identify the files that are changed and uncommitted files in
the project, which are prefixed with the icon.
For example, if you have created a copy of a test and have not yet checked in the project files into the remote Git repository, the changed asset is displayed with the prefixed icon.

-
Select the test asset that contains the changed file, right-click,
and then click Undo changes.
The changed files are listed as selected in the Undo changes window.Note: Using the Git menu option to undo changes selects only the files under that test asset that you selected. You can clear the selected resources by using the Clear All icon or by selecting the check box of the resource
that you want to clear. You can select the resources that
you want by selecting the check box or use the
Select All
icon to select all the resources
listed.
-
In the Test Factory perspective, identify the files that are changed and uncommitted files in
the project, which are prefixed with the
-
To use the Git options in the Physical View of the
Architecture School perspective, complete the following steps:
-
Open the Physical View, identify the files that are changed and
uncommitted files in the project, which are prefixed with the icon.

-
Select the test asset that contains the changed file, right-click,
and then click Undo changes.
The changed files are listed as selected in the Undo changes window.Note: Using the Git menu option to undo changes selects only the files under that test asset that you selected. You can clear the selected resources by using the Clear All icon or by selecting the check box of the resource
that you want to clear. You can select the resources that
you want by selecting the check box or use the
Select All
icon to select all the resources
listed.
-
Open the Physical View, identify the files that are changed and
uncommitted files in the project, which are prefixed with the
Results
The changes that you made in your local project files in Rational® Integration Tester are discarded and the latest version from the remote Git repository is checked out into the local repository.
Setting preferences for Git
You can specify the Git directory and workspace when you are setting Git in the bare mode or specify your credentials to access the remote Git repository by using the Preferences option in Rational® Integration Tester. You can also configure the Secure Shell (SSH) settings or the name of the remote repository.
Procedure
- From the Menu, click .
-
Click Git in the Preferences window.

-
Set up the Git repository in the bare mode by completing the following steps:
-
Set up your user credentials to enable access to the remote Git repository from
Rational® Integration
Tester by
completing the following steps:
- Select the Git credentials check box.
- Enter your user name that you set for the remote Git repository.
- Enter the password for the user name.
-
Set up the SSH communication between the client that hosts
Rational® Integration
Tester and the
server that hosts Git by completing the following steps:
- Select the SSH settings check box.
- Enter the location of the Private Key that must be used to authenticate the client with the remote server. Alternatively, click Browse, navigate to the directory, and then select the Private Key.
- Enter the passphrase configured for the Private Key in the Passphrase field.
-
Enter the name that you want to use for the remote repository in the Remote
origin field.
If you do not provide a name, the default name considered is origin.
- Click Apply, and then click OK to apply the preferences.